essential camera lenses

What are the 3 essential camera lenses?

3 essential camera lenses

essential camera lenses
If you have a camera, then it is time to start
investing in the right lenses. The right lens can be the difference between a good photo and a bad one, so it’s important that you know what your options are when shopping for new equipment. In this post we will discuss 3 of the most essential camera lenses for your photography needs.

50mm lens

The first lens that you should consider investing in is the 50mm lens. This camera allows for a more intimate feel with your subject. Since it has an equivalent of 70 millimeters on a full-frame sensor. The wide aperture makes it easy to blur out backgrounds, giving images some depth and visual interest. Since lenses are measured by their “35mm equivalent”, this 50 mm camera is great for photographing weddings, parties and social events.


essential Lenses
essential Lenses

If you only have a budget for one extra lens, go with the 50mm. It’s called ‘Nifty Fifty’ and it should be the first step on your ladder of lenses because its maximum aperture will let in more light so that you can create images with shallow depths-of-field to focus attention on a subject by keeping most other things blurred out.
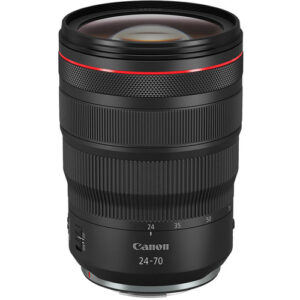
24-70mm Lenses

The second lens that you should consider investing in is the 24-70mm. This camera allows for a wider variety of shots than the previous one mentioned above due to its range from wide angle (24 millimeters) to telephoto (70 millimeters). This camera is great for landscapes, weddings and social events.
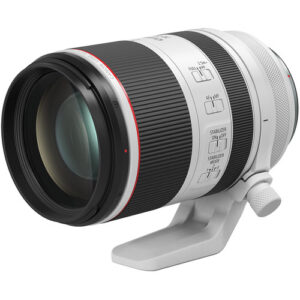
essential camera lenses

70-200mm

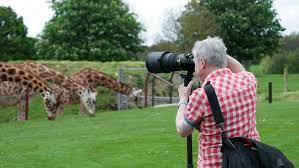
The final lens that you should consider investing in is the 70-200mm. Although it can be considered one of the most expensive lenses out there, this camera allows for some amazing close-ups at an affordable distance. It also has a telephoto range (70 millimeters) which makes it great for photographing sports, concerts and wildlife. This camera is also great for weddings because of its versatility.

Expensive Lenses
Expensive Lenses


You should consider investing in the 50mm lens.  if you want to take more intimate photos with your subject. The 24-70 mm lens. If you need a wider variety of shots. You should consider investing in the 70-200 mm camera. if you want to get closer shots at an affordable distance. The 70-200mm camera is great for weddings because of its versatility.
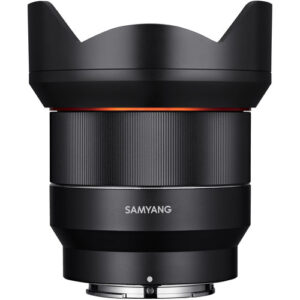
Ultra Wide-angle

If you have the budget for two new lenses. Invest in a 50mm lens followed by an ultra-wide angle optic. Kit lenses usually start at around 18mm. But that’s nothing compared to how much 14 or 16 mm changes your images.

Wide angles are especially useful for landscape photography. Where it can be great to capture a wide view and stretch foreground interest closer towards the camera.

14mm f/2.8 FE Lens for Sony E

Using a wide-angle lens makes it easier to control barrel distortion and vegetating, which is something that kit lenses struggle with when shooting at wide focal lengths.

Magical Macro lens

A macro lens is a specialized type of camera that captures images at 1:1 magnification ratios. This means the subject appears to be life-size on your screen, allowing you incredible close up shots!

Macro lenses are specialized optics that make objects appear much larger. The magnification power of a macro lens is measured by the reproduction ratio, which is defined as the relationship between an object’s size and its actual size when it projects to infinity.

Magical Macro Lenses

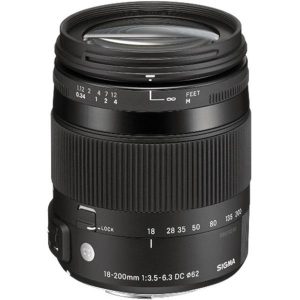
Macro lenses come in focal lengths around 100mm but some go down to 60mm for increased versatility with close-up shots at normal distances.

The 100mm lenses with a f/2.8 aperture and 1:1 ratio allow for flexibility in shooting macros of bugs, but also far more than that. This combination makes them great tools to use.

when taking photos from further away. Because it allows so much light into the lens itself Creating clearer images overall. Even if you’re not getting close up on an object or person’s face at all times. Thanks to this larger amount of light entering your camera system.


Off-Camera Flash Uses For Brightening Landscape Photographs

Landscape photography advantage is that, that the scenes in front of us tend to remain still. So we can take images of our scene in multiple exposures, then pick it afterwards with Photoshop together. 

This is amazing that only a single flashgun do the work of 10, by painting of light scenes taken during the day with several frames

Portrait experts talk about underexposing the natural light often, then using a flash to brighten the subject. This is a technique that can result in great atmosphere of portraits. So why not use the same method to create a landscape that is bold? The problem comes when neolithic burial chamber subjects in landscape images are larger than people around, means a single flash may not be big or strong enough, to light the whole scene. But there is no need to bring an arsenal of flashes. 

01 Underexpose the light

First of all, set up your camera on a tripod. Before we turn on the flash, we work out on an exposure that results in an ambient dramatic sky. As we are capturing into the setting sun, this makes most of our scene in dark shade.

02 Flash power setting

Turn on the flash light and set it to manual setting, then take test shots to check the right result. To improve the daylight we need the flash near to full power, especially if we are using a modifier. The closer the flash, the stronger the light and results will be.

03 Paint the scene

Move light around your thing by holding the flash in multiple positions and while pressing your remote release to brighten the flash and camera. Even if you are in the shot, you can remove or edit things later. Paint the subject from everywhere, and also light the surrounding ground.

04 Try a gel

If you will think your flash complimentary with natural light then it will be very helpful. Fitting a CTO (color temperature orange) gel on the flash helps to match the warmth of the less sunlight. By adding light to the scene from the behind and side, we mimic the direction of the  natural light.

05 Fake the natural light

By adding the flash light blub in frame, bright highlight can be seen and atmospheric look seems like the sun. It is good to apply gel with a warm CTO, and it will give more realistic feel if the flash is against the brightest side of the sunset so it seems as the sun has broken..

06 Flash modifiers

Flash modifiers are worth using as they help to see whether hard or soft light suits your composition. A flash modifier shape like an umbrella or softbox will spread and diffuse the light, giving you softer shades. White umbrella usefor some shots, then fired the flash bare for others.

07 Alignment time

Select the images in Adobe Bridge that you want to blend with each other, then go to Tools , then Photoshop  and finally to  Load Files into Photoshop Layers. Select the Layers panel and shift-click between top and bottom to highlight those. Go to Edit > Auto-Align Layers, choose Reposition and in the end hit OK.

Professional methods for more accurate printed photographs

Do you want good printed photographs? Follow these steps for reliable print exposure and color.

Creating quality prints is a skill of its own in the professional world of photography. Producing good colors and accurately exposing your pictures in-camera, then post-processing them is useless effort if the final result does not match what you see on the screen. 

For printed photographs to process, we need to create the same color depth and a great balance of highlights and need to have a streamlined workflow from shoot to output. 

For photographers who are experienced in the field this is likely old news – even some failed attempts in printing or several disappointing returns from online print places will be learning in print management. However, there are few steps that should be taken to make sure even better continuity of tone and more accurate results. 

Lets look at some simple and effective color control fundamentals that, while obvious in hindsight, can be overlooked by many!

Familiar surroundings

Where your editing is as important as how you process your images there is no hidden thing that the editing of images should ideally be done in neutral settings, in a room with walls and no direct light falling on the screen. Whereas, continuity is critical – find a neutral place and edit all your images in that. Changing places, even within a room, can have effects on how you see the colors in your picture. 

Calibrate regularly

Monitoring calibration is an important point in producing reliable colors. But the regularity with which you do this is also needs to be kept in view. Many photographers calibrate their screen, then don’t do repeat that. This lets time for the monitor to shift again. So, calibrate as part of your regular work may be bi-weekly.

Monitor to camera

Have you ever thought of your computer monitor and comparing it to your camera screen? Not only there are differences in how they represent color but  camera screen likely only shows you a JPEG preview of your RAW files. Select a flat JPEG profile in-camera, then compare a reference image on both your camera LCD and editing screen, to identify discrepancies. This will help you capture more reliable colors in the field, minimizing how much later color adjustment is required, and reducing the likelihood of unwanted settings making it to print.

Compare prints to screen

If you have any reference prints, after employing some of the other steps featured, compare those to the final images on-screen. This will help you see where you have over-compensated or under-compensated for color or exposure issues. Shadows seem dark in print, so this process enables you to adjust your editing approach for that specific paper and printer combination. 

Adjust screen for setting

Sometimes you have to leave your common editing space. When this is unresistable, take note of the places or similar lighting conditions you find yourself working with– this can enable you to adjust the color balance of your system’s screen, to more precisely adjust for the change. The aim of this activity is to reproduce the screen appearance in your standard editing area, giving you more color consistency.

When you understand the balance between your perception of color in your images and how this translates through a printer, onto paper, you can make adjustments to edit your image. This helps gain more predictable colors and fewer wasted prints!


For more information or buying best cameras or camera accessories in Karachi please contact us.

Sony ZV-E10

Hands-on with the Sony ZV-E10: Digital Photography Review

Hands-on with the Sony ZV-E10

The Sony ZV-E10 is an APS-C, E-mount interchangeable lens camera designed primarily for vlogging. It’s largely based on the company’s entry-level a6100, with a three-capsule microphone and fully articulating LCD display (and no electronic viewfinder) being the main cosmetic differences compared to the older model. It offers the same excellent autofocus system, image quality, and performance as the a6100.

It inherits most of the software features from the Sony ZVE-10 compact vlogging camera, including the background blur and Product Showcase features, livestreaming capability and soft skin mode.

Taking a concept that originated with the ZV-1, the ZV-E10 is the mirrorless continuation of this idea of a camera built around the concept of vlogging. It’s a highly capable and portable camera but incorporates a series of design choices and shooting modes that are ideal for single-person productions. A vari-angle screen lets you accurately frame up shots, the integrated directional mic is purpose-built for recording more accurate sound from front-facing subjects, and shooting modes like Background Defocus and Product Showcase help you highlight specific subjects with ease.

In terms of specs, the ZV-E10 revolves around a 24.2MP APS-C Exmor CMOS sensor, which enables UHD 4K video recording up to 30p, Full HD recording at 120p, and stills shooting up to 11 fps. Sensitivity ranges from 100-32000 for working in a variety of lighting conditions and the sensor’s design also integrates a 425-point Fast Hybrid AF system for accurate tracking and detection of subjects.

The body design is reminiscent of Sony’s other Alpha E-mount cameras and features an intuitive control layout along with the functional 3.0″ vari-angle touchscreen LCD for intuitive settings control and framing. With audio being a main concern of vlogging and creative content, the ZV-E10 focuses on this aspect of recording by including a 3-capsule directional mic into the camera design as well as incorporating both 3.5mm mic and headphone ports and having the top Multi Interface shoe support a digital audio interface for improved audio quality.

Features

Optimized Camera Design

  • Rear 3.0″ 921.6k-dot touchscreen LCD features a side flip-out design that is ideal for filming yourself or taking selfies in a natural and intuitive manner.
  • Side-opening screen allows for a redesigned top plate, which incorporates a directional 3-capsule microphone that is specifically designed for forward-directional audio recording. Also, a dedicated wind screen for the built-in mic is included to help achieve cleaner audio when working outdoors.
  • Both 3.5mm microphone and headphone ports are also featured for more advanced audio recording, and the Multi Interface Shoe also benefits audio recording capabilities. This accessory shoe supports a digital audio interface that helps to achieve lower noise during recording and also eliminates cable clutter and the need for external power when working with compatible shoe-mounted mics.
  • Front tally lamp serves as a visual indicator for when recording is occurring. Also, the LCD can display a red border frame to further serve as an additional recording indicator.
  • Live streaming is possible directly from the camera simply by connecting the camera to a computer or compatible mobile device via USB, allowing the camera’s video and audio capabilities to be used for live social media and video conferencing. UVC and UAC standards are supported for improved picture and sound quality during streaming.

Specialized Shooting Modes

  • Product Showcase setting is ideal for vlogging and product review or demonstration videos and allows for quick and smooth focus transitions between a subject’s face and an object placed in front of the lens.
  • Background Defocus lets you immediately switch to the maximum aperture setting of the attached lens, using a custom button function, for isolating your subject using shallow depth of field and bokeh.
  • Face-Priority AE detects the subject’s face and adjusts the exposure to ensure the face is depicted in an ideal brightness, even if walking from a bright place into shade. The AE technology also suppresses abrupt changes in exposure if the subject quickly turns away from the frame to eliminate unexpected blown-out or extremely dark shots.
  • Refined color science helps to optimize skin tones for any subject, in both still and video modes, in order to achieve a healthy and natural look that is inclusive of different ages, genders, and ethnicity.
  • Soft Skin Effect can be used to soften and smooth wrinkles or blemishes on a subject’s face to create a natural, smooth complexion. The default setting is Mid and can be adjusted to Off, Low, or Hi. For longer takes, extended continuous video recording is available when setting the Auto Power OFF Temp. function to High.
  • Movie footage can be tagged with specific metadata to indicate vertical recording orientation for direct playback in smartphone apps or for other instances when vertical video playback is needed.
  • Active SteadyShot is an advanced image stabilization mode that ensures steady video while moving, even when handheld shooting while walking.

Image Quality, Autofocus, and 4K Video

24.2MP APS-C Exmor CMOS Sensor and BIONZ X Processor

  • A revised APS-C-format 24.2MP Exmor CMOS sensor realizes smooth, nuanced image quality with minimal noise and high sensitivity from ISO 100-32000, which can further be expanded to ISO 51200 for working in low-light conditions.
  • The sensor dimensions are approximately 3x larger than a 1″ sensor, and up to 10x larger than some smartphone sensors, enabling greater sensitivity, reduced noise, and improved control over depth of field.
  • The sensor and BIONZ X processor combination also avails a top continuous-shooting rate of 11 fps with AF and AE and permits 14-bit raw file output for a wide tonal and color scale.

425-Point Fast Hybrid AF

  • The sensor’s design incorporates a 425-point Fast Hybrid AF system, which blends both phase-detection and contrast-detection methods to achieve focusing performance that is fast, natural, and accurate.
  • The on-chip focusing system covers 84% of the sensor field and is capable of achieving focus in as little as 0.02 sec.
  • Real-time Eye AF can prioritize focusing on human or animal eyes for ensured sharpness when making portraits. When selected, this function is activated by half-pressing the shutter button and you can further choose to prioritize either the right or left eye.
  • Real-time tracking utilizes AI-based algorithms to automatically recognize and track moving subjects. If Face/Eye Priority AF is on, this tracking method will further track a subject’s eye or face in real time with seamless changing depending on the status of the moving subject.

4K Video Recording

  • UHD 4K video recording is possible up to 30p and uses full pixel readout with 6K oversampling to yield greater detail with reduced moiré and aliasing. Full HD 1080p recording is also supported in frame rates up to 120 fps, and both resolutions utilize the 100 Mb/s XAVC S format contained within an MP4 wrapper with 4:2:0 sampling. In addition to high-resolution internal recording, uncompressed HDMI output also enables the use of an optional external recorder for clean 4K recording with 4:2:2 sampling.
  • Slow & Quick (S&Q) mode allows shooters to capture Full HD video at specified steps between 1-120 fps. These settings will allow you to slow down action as well as speed up a slow-moving scene.
  • No recording limit for movie recording, allowing for longer takes and uninterrupted shooting of live events.
  • Affording extensive customizable color and gamma controls, the ZV-E10 allows users to adjust the gamma, black level, knee, color level, and more. Use the same S-Log2 Gamma Curve that is found on high-end Sony Cinema cameras, which squeezes up to 1300% more dynamic range into the video signal then traditional Rec. 709, for increased post-production flexibility. HLG (Hybrid Log-Gamma) support is also available, along with the BT.2020 color space, for recording within a wide color gamut and, in addition to S-Log2, S-Log3 is also available for producing an effective 14-stop dynamic range with increased grading control in the shadow to mid-tone regions of the image.
  • Interval shooting mode is ideal for creating time-lapse movies with the aid of Imaging Edge software. Intervals can be selected between 1-60 seconds for recording up to 9999 sequential free. Also, in-camera battery charging is possible via the USB port using a portable battery to benefit long interval shooting sessions.

Physical Design and Wireless Connectivity

Camera Body Design

  • Built for portable applications and one-handed use, the camera incorporates a large right-hand grip and intuitive physical control layout.
  • Grip design, along with the vari-angle LCD, also suits working from front-facing angles, such as when vlogging or taking selfies.
  • Integrated zoom lever surrounds the shutter button and works in conjunction with select Power Zoom lenses.
  • Vari-angle screen can be closed against the body, with the screen facing inward, to automatically power off the camera even when the power switch is set to ‘On’.
  • Dedicated Movie Record, Background Defocus, Product Showcase, and S&Q buttons provide direct access to common features used by vloggers.
  • Included NP-FW50 battery is rated for up to 440 shots or approximately 125 minutes of recording per charge. Power can also be supplied to the camera through the USB Type-C port or by using the optional AC-PW20AM AC adapter.

Wireless and Sharing

  • Built-in Bluetooth and Wi-Fi connectivity enables instant transferring of imagery to mobile devices for direct sharing online to social networking, via email, and to cloud storage sites. Once connected, the linked mobile device can also display a live view image on its screen and, using Smart Remote Control, remotely control the camera’s shutter release.
  • The ZV-E10 is also compatible with the Movie Edit add-on from the Imaging Edge mobile app.
  • Bluetooth connectivity enables connecting to the optional GP-VPT2BT Wireless Shooting Grip for efficient camera control.

For Sony ZV-E10 price in pakistan please contact us

4 Ways To Improve Your Outdoor and Nature Photography Skills

As the days get longer, many of us long to be outside. This is especially true for photographers, who know good photographs are waiting to be taken in uncharted territory. If you have the itch to get outdoors, consider going beyond your neighborhood park and tackling a true adventure: a hike.

Once you’ve filled your backpack with the essentials you’ll need for the duration of your hike, it’s time to pack up your camera gear and head out. Before you leave home, though, read through these tips that can help you snap phenomenal photos while also enjoying breathtaking views.

Map Your Route

The first tip is something you’ll need to do before you leave home. Carefully research different hiking spots and choose one that can add to your portfolio. Look for a trail that will add diversity to your portfolio, rather than shots similar to the ones you already have. Once you’ve identified the perfect trail, map your route, highlighting significant hot spots along the way. Apps like MapMyHike can help you plan your journey electronically, allowing you to go offline once you’re on the trail.

Don’t Pass Up a Photo Opp

As you start your journey, it’s important to stop and capture every photo opportunity you see. You may pass something and tell yourself you’ll catch it on the way back, but by then the lighting may have changed or you may choose a different return route. Make plans to arrange your hike around the photos you’ll capture and you’ll find you don’t rush past the highlights. If capturing the perfect shot means varying from your route slightly, make sure you can safely do so, then go for it. Some of your best shots will be completely unplanned.

Look for Unique shots

Nature scenes are so prevalent, they can tend toward mundane if not handled correctly. Develop an eye for noticing a picture that will stand out and take your hike as the opportunity to capture unique images. Along your hike, search for long streams or tree lines that span the length or width of the photo, drawing the viewer in and creating a unique, interesting look. Use leading lines and the rule of thirds for photos that will stand out in your portfolio and possibly even get you noticed.

Avoid the Obvious

Thousands of photographers have snapped photos of streams and mountains. Your goal as a photographer is to find a way to portray nature in unique ways. Look for reflections and shadows that add interest to an otherwise average photo. Even the way the sun peeks from behind the clouds can make an ordinary photo extraordinary. As a photographer, you already have an eye for the unique. A hike merely gives you new ground to explore, where you can potentially find something unique every step of the way.

As a photographer, your portfolio can be dramatically limited if you stay within the same area every day. By venturing out and taking a refreshing hike, you can expand your portfolio with shots that stand out. With a little careful planning and an open mind, you’ll come back with more than a full portfolio. You’ll also have made a few memories that will last a lifetime.

Please contact Golden camera for the best camera or camera accessories in Pakistan

Essential time-saving Photoshop tips

One of the hallmarks of mastery is the ability to get more done with less effort. It can be a treat to watch somebody work with a tool or do an activity that they are truly fluent in – no superfluous movement or wasted energy.

In this article, I’ll share 5 shortcut tips and tricks that I use every day to streamline my workflow. The goal of these shortcuts is to allow editing to progress in a smooth, uninterrupted fashion. Whenever I need to click into a menu – or, worse, dock my stylus in order to type something with both hands – it’s like hitting a speed bump. It kills my productivity.

To maintain efficiency, I keep one hand on the mouse or tablet stylus as much as possible, and use the other hand to update tools, settings or contexts via keyboard shortcuts – I call this “fluent editing.”

Here are the shortcuts that I find most useful, along with tips for combining them in a fluent manner. While many of these shortcuts and techniques may be familiar to you already, they can be combined to minimize context switches for maximum efficiency. Read More Essential time-saving Photoshop tips

Why We Use Photoshop: Top Photographers Explain

Photoshop has been a valuable tool for photographers of all kinds for years in the photo industry. From basic color adjustments to full-on photo manipulations, the sky’s the limit when working in this program. If you’re new to the world of photography, you might not fully understand the benefits of using Photoshop. That’s why we’re going to discuss exactly what makes Photoshop so useful for photographers in this post.

Photographers use Photoshop for a variety of purposes ranging from basic photo editing adjustments to photo manipulations. Photoshop offers more advanced tools compared to other photo editing programs, which makes it a valuable tool for all photographers. 

So what exactly are those tools that add so much value? Well, let’s break it down and go over a few of the most important reasons why photographers use Photoshop.

Reasons Why Photographers Use Photoshop To Edit Photos

No matter what type of photos you’re working with, Photoshop offers tools to enhance any image. From color, exposure, spot removal, and image blending adjustments, there’s a long list of advantages. Although I could talk about this all day, let’s focus on the most useful aspects of Photoshop.

You Can Edit Photos Non-Destructively

Non-destructive editing means that you can make any adjustment without permanently applying it to your image.

In some photo editing programs, each adjustment is directly applied to your photo. In Photoshop, you can use layers to keep every adjustment separate from the image.

This is a huge advantage for any photographer since it’s much easier to go back and refine certain adjustments. Especially when you’re editing for a client and need to do a re-edit, you can target the exact adjustment faster than in other programs.

In Photoshop, every adjustment or adjustment layer is put onto a new layer. With layers, each change to your photo is added in front of the previous. Just like makeup, the different adjustments combine to create a new look to your image. However, the starting image remains unchanged beneath all of the layers.

It Uses Layer Masks To Refine Adjustments

One of the huge advantages of Photoshop is something called layer masks. This is a tool that helps to change where a certain adjustment is visible.

For example, let’s say you wanted to brighten the subject in your photo. With a regular exposure adjustment, it would brighten the entire photo. However, with a layer mask, you can make that exposure adjustment only appear over your subject.

This same idea applies across all the different adjustment layers in Photoshop, making it very easy to refine color and exposure in your image.

Although other editing programs do have their own versions of masking, they simply don’t compete with the layer masks in Photoshop.

Using black or white on the mask to identify visible or transparent areas, it’s easier to understand where an adjustment is taking place. Even if you have a hundred different layers, all with their own layer masks, you could easily identify what each one is affecting.

That same ability isn’t as simple in programs such as Lightroom or Luminar. In those programs, it can get confusing where all of your adjustments are targeting after you start adding more and more.

The simplicity of layer masks in Photoshop creates another big draw for photographers to use the program.

There Are More Spot Removal Tools

The one tool every photographer needs is a spot removal tool. This type of tool works to remove unwanted distractions from your photo and clean up your image.

In most photo editing programs, there are only a couple of basic spot removal options to choose from.

With Photoshop, there are 5 different spot removal tools, each offering a unique purpose.

Whether you’re looking for an automatic spot removal adjustment or want to do it manually, Photoshop has a tool for the job. This program does a far better job at retouching images and blending those new spot removal adjustments into the photo. After only a few minutes, you can easily remove even the most complicated objects from an image.

One powerful aspect of Photoshop’s spot removal tool is the content-aware feature. This feature scans your entire photo to find the best possible match to fill a selection area with. That means the program can make accurate spot removal adjustments that look flawless in the final image.

Sometimes better than what you could have done manually.

It’s Easy To Blend Multiple Photos Together

There are a wide array of photography techniques that require you to merge multiple photos together. For example, you might want to focus stack, blend exposures, or create a creative composite image.

In other editing programs, it’s difficult or impossible to blend photos because there aren’t any layers.

With Photoshop, you can add multiple photos into the same project, but on different layers. Then you can use layer masks to refine where each photo appears in your final image.

For creative effects, having this ability is second to none and is what separates Photoshop from other programs.

There Are Graphic Design Options

Every photographer will come to a point where they need to do a little more than just edit a photo. Especially if you’re running your own business, you need to make video thumbnails, promo images for social media, or even to design a logo!

Although there are options such as Canva for this, a lot of photographers prefer to use a program they already have and know how to use.

And in Photoshop, there are countless tools for creating professional-looking graphic designs.

Whether you want to make a simple text-based thumbnail or get more in-depth with textures, lighting effects, and shapes, it’s all possible with Photoshop. It’s truly an all-in-one program for any creative looking to work with digital images.

So now you have a clear idea of why photographers use Photoshop in their work. This program offers countless advantages that simply aren’t available in other editing programs. With more advanced adjustments, non-destructive editing, layer masks, and better tool options, it’s a no-brainer to use the program.

If you’re looking to see all these features in action, contact us

Basic Photo Restoration: How to Restore Old Photos Using Photoshop

Do you know that strange red tint on all of the photos in your family albums? It has a name – it’s called a color cast. Most old pictures have one, and if you can and upload them to Photoshop, you can easily do away with it.

Essentially, though, what Matt means is that to get the best results you’ll close the gaps between the edge of the range for each of the channels: red, blue, and green. It’s a simple technique that just requires a little slide of the mouse. And even though it’s a simple action, the results are impressive

Steps to Restoring Old Photos in Photoshop

To enhance your old photos, we’ve listed down several steps you should follow. These steps apply to digital photo restoration using the latest version of Adobe Photoshop.

  1. Digitize your old photo.
  2. Open the image in Photoshop.
  3. Crop, straighten, or rotate the image.
  4. Make the necessary adjustments to your image.
  5. Apply a filter to reduce noise.
  6. Save the newly restored image.

Digitize your old photo

a scanned film photo of a family


The first step is to scan the photo to get a digital copy. You can use a regular photo scanner, take a photo using a digital camera, or use a scanner app on your smartphone.

Whichever method you use, make sure that it will yield a large, high-quality copy of the photo to make it easier to work with.

Open the image in Photoshop

Next, open the digital image in Photoshop. Then create a second copy of the image. You’ll want to keep an original copy for reference, so you’ll be working on altering the second copy.

How to create a duplicate copy of an image in Photoshop:
  • Select a layer in the Layers panel.
  • Drag the layer to the Create a New Layer button, or select the Duplicate Layer option from the Layers menu or Layers panel menu.
  • If you’ve selected the Duplicate Layer option, give your layer a name, and click OK.

Crop, straighten, or rotate the image

Before you can begin making any adjustments, make sure that you’re working with a clean, properly oriented image.

If there’s any unwanted white space (or any kind of space that shouldn’t be there) around the edges, you can simply crop all of that out.

How to crop your image:
  • Click on the Crop icon on the toolbox (on the left side of Photoshop’s default workspace).
  • Draw a new cropping area or drag the edges of the crop box to the desired positions.
  • Press Enter (Windows) or Return (Mac OS) to crop the image.

f the scan of your image is a bit crooked, you can straighten it out using the crop tool.

How to straighten a crooked image:
  • Click on the Crop icon, then click the Straighten icon on the toolbar.
  • Drag a line along a horizontal or vertical element in the photo.
  • Let go of the mouse so that Photoshop can rotate your image and crop its uneven edges.
  • Once you are satisfied, press Enter. Photoshop will also remove the excess image if you’ve enabled the Delete Cropped Pixels checkbox.
How to rotate your image:

Photoshop CC lets you rotate your image through its Image Rotation setting or the Transform function in the Edit menu.

To rotate your image using the Image Rotation option:

  • Click on Image in the taskbar.
  • Select Image Rotation.
  • Choose your preferred rotation.

To rotate your image using the Edit menu:

  • Click on your image to select it.
  • Click on the Edit menu, then choose Transform.
  • Choose your preferred rotation.

Make the necessary adjustments to your image

There are two ways to do this step in Photoshop: adjusting your image’s color and fixing its damaged spots.

Make color correction adjustments.
https://www.youtube.com/embed/RPn5fTWCZnU

Old photos are usually faded, but if you want to improve the tone, color, contrast, and overall vibrancy of the photo, Photoshop can do these, too.

If you select Image from the taskbar, you’ll see a drop-down menu that will pretty much give you everything you need for some basic color correction. Under Adjustments, you’ll see three options: Auto Tone, Auto Contrast, and Auto Color. Try these out first and see if these automatic corrections deliver your desired effect. If not, you can do these corrections manually.

It’s a good idea to learn how to read the histogram so that you can make highly accurate adjustments. From there, select Adjustments and use the different functions under this menu option. There are basic adjustments such as Brightness, Contrast, Exposure, and Vibrance, or the slightly more in-depth adjustment tools such as Curves and Levels.

Depending on the condition of your photo, the best thing to do is to play around with these different adjustment tools to get the right tone, color, and contrast.

If your image has a color cast, here are a few steps to follow to correct the effect:

  • Highlight your duplicate layer, then click on the adjustment layers icon under the Layers panel.
  • Choose Levels from the adjustment layer options.
  • To adjust your photo’s RGB (red, green, and blue) levels, click on the dedicated tab. A RGB menu will appear.
  • Click on any of the color options, then bring the white and black sliders to the histogram’s upward line.
  • Once you’re done adjusting the RGB levels, click on the Layers panel to exit.
  • Highlight your duplicate layer and your adjustment layer, then right click on the area and select Merge Layers to combine both layers.
Fix the damaged spots.

This part is where it gets a bit tricky—you’ll definitely need an eye for detail and a whole lot of patience! If there are any scratches, stains, and other unwanted marks on your photo, you can use a few beginner-friendly spot correction Photoshop tools: the Spot Healing Brush, the Patch Tool, and the Clone Stamp.

How to use the Spot Healing Brush:
  • Click on the Spot Healing Brush icon (the one that looks like a band-aid) on the toolbox.
  • Choose your desired brush size in the options bar.
  • Choose between the Proximity Match, Create Texture, or Content-Aware Type options. Any of these options should work for what you’re trying to achieve.
  • Select or deselect the Sample All Layers option if you want to sample data from all layers or one active layer.
  • Click on the spot you want to fix, or click and drag the brush over imperfections in a larger area.
  •  
How to use the Patch Tool:
  • Select the Patch Tool.
  • Select the area you want to repair by dragging, then select Source in the options bar. You can also select your sample area by dragging and selecting the Destination option.
  • Adjust your selection by using the Shift-drag, Alt-drag/Option-drag, or Alt+Shift-drag/Option+Shift-drag combinations.
  • Select Transparent if you want to extract a transparent texture from your sample area, or deselect it to put the sample area over the target area.
  • Adjust the Diffusion slider.
  • Place the pointer inside your selection, then drag it to your sample or patch area.

Apply a filter to reduce noise

You can’t magically get rid of the dust and scratches with just a press of a button—you’ll have to do it manually. However, you can make that job easier by using Photoshop’s Filter functions to reduce some of that unwanted noise.

Save the newly restored image

Once you’re happy with the image, delete the unedited layer (the original reference layer) or right-click the edited layer and select Flatten Image (make sure that your edited layer is on top). After that, just follow the steps below to save your photo.

5 Tips to Create A Brand Envy Photoshoot

Are you a small business owner, entrepreneur or a brand enthusiast looking for a social media transformation? Having a library of custom images for blogging and social media will drastically improve your digital strategy and have an enormous impact on how people engage with your brand. 

Photographer and brand strategist Jasmine Star’s teaches that memorable content begins with a strong point of view, authenticity, and consistency. In this sneak peek from her upcoming class ‘Your Social Media Bootcamp’ she explains how to create content that shares ideas and educates your ideal clients while still promoting your brand.

5 Tips To Prepare A Branded Flat Lay

  1. Don’t back away from collaborating with your photographers. They can help identify a visual story that speaks to your brand and create a series of flat lays that will cohesively work together. 
  2. Identify your brand’s visual style. Create a mood board or Pinterest board that speaks to your ideal customer that inspires and motivates them. The more visual references you have the easier it will be to collaborate with your photographer for the perfect shot. Subtle differences in color palettes, finishes, and quotes will make a big difference in how people remember your brand.
  3. Less is more. Photography is a subtractive art form. Be selective about what you choose to include in your flat lay images and leave negative space to add text in post-production with apps like Canva or WordSwag. 
  4. Incorporate motivational quotes as an engagement driver. Blank labels and smartphone screens are great to add text post-photoshoot.
  5.  Create a list to get all your props ready. Start by identifying props that compliment your brand story then divide your props for styling business and casual photos.

With research suggesting that people are more likely to remember content they’ve seen in images, rather than text, it’s crucial that the photography representing your business perfectly reflects your brand.

Tone And Palette

It’s important the tone of your photo incites the feeling you want your audience to associate with your brand. For a calming, high quality effect, high-exposure images with a large depth of field, creating out of focus foreground and background should be used. Minimalism and warm and neutral tones are important to create a sense of relaxation. Take luxury body-care brand Aesop. Their use of warm tones and minimalism reflects their packaging and each photograph across their website and their instagram reflects this aesthetic.

Highlight People

The people in your photos communicate a lot, as humans are hyper-intelligent when it comes to recognizing emotions on other people’s faces. This can be used to quickly communicate how your product makes people feel. For example, university images are likely to show people looking intrigued or engaged – demonstrating the interest they feel in their studies; while images from a day spa are likely to depict relaxed, serene people. Swap those styles around and suddenly things get very confusing – why are the students asleep at university, and what kind of day spa makes you sit exams?

For more information or buying Best Camera or to know camera price in Pakistan, please contact our experts

Tips to Shoot Safari-Style Photos

Now that zoos and wildlife parks are open again, here are some tips to take photographs worthy of a safari.

Unlike safaris, where there’s no guarantee of seeing your favorite animals, wildlife parks offer assured access to these incredible creatures – but the drawback is that there’s a physical barrier between you and them. Though that’s no bad thing, considering these are predators that could consider a photographer to be a snack! 

By following these steps, you can take brilliant and natural-looking images that look like they could have been shot in the wild – but you’ll need to try to get closer access than a regular zoo can provide. 

01. Lens choice

We used a Canon EF 100-400mm telephoto-zoom – but as we got close to the animals, we could get away with a standard zoom too. Longer focal lengths and faster apertures enable you to achieve a shallower depth of field – all important for that ‘on safari’ look. 

02. Exposure and aperture

Shoot in aperture priority or manual and start with an aperture of around f/5.6. This will ensure that the animals’ facial features are sharp, with their bodies slowly falling out of focus – and distracting backgrounds, such as fences that give the game away, will be blurred.

03. Spot metering 

It’s crucial that the animal is properly exposed – set spot metering so that the exposure is weighted towards the selected focus point, which will be on the cat. The center-weighted metering mode would try to expose the entire scene, but the subject is more important.

04. ISO and shutter speed

The big cats we were shooting weren’t running around, so we didn’t need a super-fast shutter speed – just enough to avoid camera shake. Aim for at least ‘one over’ the longest focal length of the lens – so, 1/400 sec for a 400mm. Increase the ISO, if needed, to achieve this.

05. Continuous focusing

Set continuous autofocus mode to track the animals, combined with a low-speed continuous burst mode. You don’t need to be shooting at 10fps for these cats, so avoid high-speed continuous to avoid filling up the memory card. 

06. Pinpoint focus

Set a single AF point mode and position this at one side of the frame, so that there’s negative space for the cat to move into. Keep focus on the animal’s nearest eye so that it’s sharp as you follow it around. Zoom in and out to capture a variety of body shots and close-up portraits shoots.

07. Set-up: zoom in close

The combo of wide aperture, telephoto focal length and your focusing distance will mean your depth of field is so shallow that the bars on the cage will vanish. For the best results shoot as close to the fence as you possibly can, then be bold with your composition and fill the frame with these strong animals. As we discovered up close, male lion’s heads are huge – so it’s easy to get a tightly framed portrait even when shooting at 100mm.

08. Set-up: exposure compensation

Big cats come in all colors, from near-white lions to black jaguars, and spot metering will ensure that your camera biases its exposure to the subject. However, your metering system will still try to expose for a mid-tone, so you will have to dial in negative exposure compensation for cats with dark fur, and positive exposure compensation for animals with lighter fur (if shooting in manual mode, increase or decrease the ISO and/or shutter speeds).

09. Set-up: better backgrounds

Try lots of compositions, and try placing your subject to one side of the image and leaving space for it to look or ‘move’ into. Look to avoid man-made objects in the frame to maintain the natural ‘safari’ feel to your shots. If you can’t blur out the fence at the end of the pen, try composing with some more natural elements positioned behind the animal.

10. Set-up: capture behavior

Look to take dramatic photos that capture the big cats displaying emotion – and their impressive teeth! This can help show a powerful predator on the prowl, rather than a captive cat. These beasts love to climb up high, and this offers a great chance to zoom in with a super-telephoto to capture them against the sky. A good tip is to find out from your guide which cats are likely to show off, then be patient and sit ready with your lens raised and pre-focused on them; it may be a fleeting display, so shoot with a fast shutter speed.

For more information or buying Best Camera or to know camera price in Pakistan, please contact our experts