- Camera
- Camera Lenses
- Camera Gimbals
- Camera Accessories
- Abs Flight Case
- Articulated Magic Arm
- Bag Case
- Batteries Power
- Blackmagic Accessories
- Camera Carry Strap
- Camera Dry Box
- Cleaning Kit
- Cups
- Dji Accessories
- Filters Accessories
- Flash Diffuser
- Gopro Accessories
- Insta360 Accessories
- Laptop Accessories
- Lens Hoods Caps
- Memory Cards
- Micro Photography
- Tripods Support
- Drone Camera
- Video Lights
- Lighting & Studio Accessories
- Pro Audio
- Studio Production
- Mobile Gimbal
- Gaming Consoles
- Apple Macbook
- Top Selling
How to Use a Softbox for Perfect Lighting in Photography
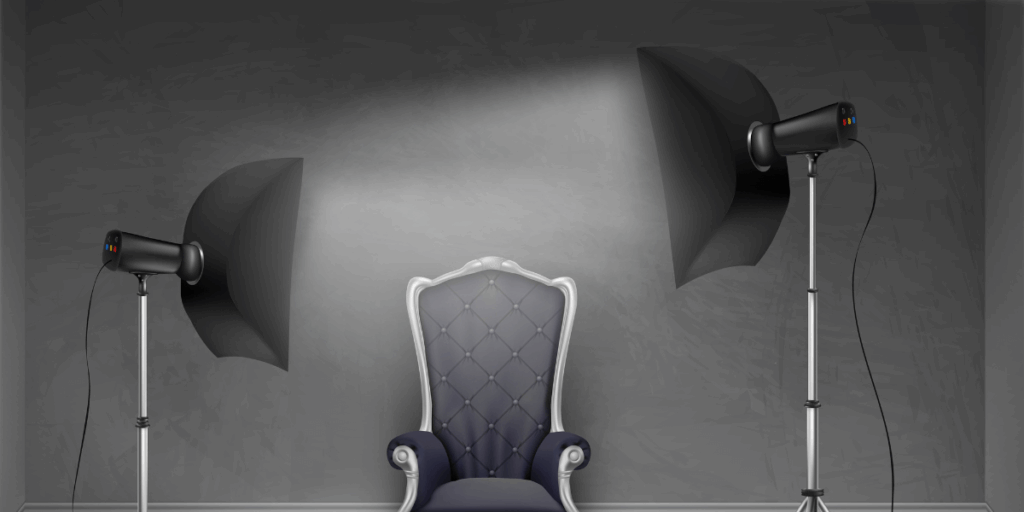
How to Use a Softbox for Perfect Lighting in Photography
Good lighting is the key to stunning images, and one of the most effective ways to achieve beautiful light is by using an artificial light source. Countless lights are available today, coming in all shapes and sizes, each packed with features designed to help you create the perfect light. No matter which light fixture you choose, a softbox is an essential accessory that works wonders with any lighting setup.
Either way, it’s a must-have item, and in this article, we’ll explore all the softbox essentials you need to know. Scroll down to the bottom, and you will learn about it.
What is a Softbox?
A softbox is ideal lighting equipment that helps create softer, more diffused light. Even the best quality lights can cast harsh lighting without a softbox, making it tricky to capture beautifully lit images. Softboxes vary in shape and size, helping to diffuse light for even illumination and control its direction.
How To Set Up A Softbox
Now that you’ve discovered what a softbox is for photography, why not dive into this guide to explore how to use one effectively? Check it out below:
Attach the Softbox to the Light
- Begin by placing your softbox securely onto your light source.
- Most softboxes are designed for ease of use and typically attach with a speed ring, which is crucial for compatibility across different lighting brands.
- The speed ring simplifies the connection process, ensuring a stable setup.
Positioning the Light and Softbox
- Once attached, adjust the light and softbox’s positioning to illuminate your subject effectively.
- A recommended approach is to set the softbox at a 45-degree angle relative to your subject. This placement generally yields optimal lighting effects.
- Do not hesitate to experiment with various angles, as this can lead to unique and creative outcomes.
Adjust the Light Power
- After securing the softbox, the next step is to adjust the light intensity to achieve the desired effect.
- Vary the distance of the softbox from the subject to modify the light’s intensity appropriately.
- Utilize any included accessories or slightly adjust the setup to enhance your results.
- Many softboxes come with tools that allow you to fine-tune the lighting beautifully to suit your specific scene requirements.
Utilizing Softbox Accessories
- One commonly used accessory is a grid, which attaches directly to the front of the softbox.
- Grids are available in round or square designs, featuring openings at the front that help focus the light.
- The primary advantage of a grid is its ability to direct light onto the subject while minimizing spillover to other areas in the frame.
- By narrowing the softbox light’s spread, grids enhance your control over your lighting setup.
- Various other accessories, in addition to grids, allow you to create even more stunning lighting effects, allowing for greater creative freedom.
What Size Softbox is Best?
Finding the ideal softbox depends on what works best for you and your specific needs:
Smaller softboxes (2 feet or smaller):
- Ideal for macro photography.
- Offers greater control over light.
- Produces harsher light, preferred by some.
- This softbox lighting is ideal for beginners.
Medium softboxes (3-4 feet):
- Great for most photographers.
- Provides excellent light quality.
- Portable and versatile, suitable for portrait photography.
Large softboxes (5 feet and larger):
- Best for full-body shots or multiple subjects.
- Commonly used in studios for fixed setups.
What Shape of Softbox is Best?
Softboxes come in various shapes, each affecting light quality. Rectangular softboxes are popular for portraits and product photography, creating a narrow beam that mimics window light. Square softboxes give even light, while octagonal ones create flattering, rounded light for portraits.
When choosing the right softbox shape and size, it’s crucial to consider what you need it for and how it will fit into your space. If you often travel and shoot outdoors, consider looking for a softbox that’s easy to set up and take down quickly and compactly.
Those working in a permanent studio can use a slightly larger light since they won’t have to transport the softbox to every shoot. And if you’re still unsure which softbox to pick, a medium-sized square softbox is a fantastic option that works well for anyone needing one!
Softbox Lighting Examples For Your Images
Have you mastered the basics of softbox lighting? If you want to use softbox lighting like a true pro, you’re in the right place! We’re excited to share our favorite lighting setups, complete with diagrams and example images, to help you. Take your time practicing each setup until you feel comfortable, and then feel free to modify them to create your unique looks. Easily create a 5-in-1 reflector utilizing white poster board.
Frontal loop lighting
For a beautiful, three-dimensional image, place the softbox about a foot or two in front of your subject and gently adjust it to the side. This slight angle will cast soft, delicate shadows on your subject’s face, adding a lovely touch of drama and depth.
Since these shadows are subtle, this setup works wonderfully for family portraits and other classic portrait sessions. Remember that the shadow of your subject’s nose should fall slightly down and to the side, forming a charming “loop.”
45-degree loop lighting
This softbox lighting setup aims to create a dramatic loop-lighting effect. Position the softbox about 45 degrees to the side of your subject and elevate it slightly to point downward, keeping it close to the face. This produces a softly lit portrait with more shadows, particularly the loop shadow beneath the nose.
Loop lighting with a reflector
This setup is similar to the previous one, with a few little tweaks! Position the softbox far away and add a white reflector on the camera’s right side. Moving the softbox back a few feet allows you to slow down the light falloff, which means the shadows won’t be as overwhelming. The reflector will also help soften those shadows!
Clamshell lighting
This is such a classic glamor setup, and it truly works wonders with a medium-sized softbox! Position your softbox right in front of your subject and above it, angle it downwards at about 45 degrees. Then, place a reflector in front of your subject, below it, and aim it upwards at the same angle to create beautiful lighting.
When combined, these elements form a delightful clamshell shape, which is why this lovely pattern is commonly called “clamshell lighting.” The result is a flattering portrait setup ideal for fashion and glamor photography.
Soft side lighting
Here’s another fun, straightforward softbox photography setup that delivers a moody, shadowy shot! Put the softbox at a 90-degree angle to the camera, adjacent to your subject’s side. Then, encourage your subject to turn towards the camera, and watch the magic happen.
Distant softbox
Keep your softbox close for soft light. However, to create a more intense lighting effect, consider pulling the softbox back for that added drama.
The Best Soft Box Lighting Kit
Read about the best soft box lighting kits that you can get for your use:
Godox SK400II Studio Strobe
The Godox SK 400 II offers a guide number of 213, making it a great budget-friendly flash with a daylight-balanced temperature of 5600 K. It has a quick recycling time of 4-3 seconds and can produce flash durations as brief as 1/2000 of a second.
Power settings range from 1/16 to full power with 40 fine-tuning steps. The 150 W modeling light has two modes: proportional for effect previews and Percentage for brightness adjustment (5-100%). Settings are user-friendly. Users have trigger options including a sync cord, test button, and slave triggering.
The SK 400 II features a 32-channel radio system for seamless wireless control with the optional XT 16, FT 16, or TTL transmitters. It also includes an anti-pre-flash function, enhancing compatibility with point-and-shoot cameras and those using pre-flash. It weighs 4.6 lbs, and the SK 400 II allows easy assembly with multiple heads. This includes a Bowens front accessory mount compatible with Godox modifiers and accessories from various manufacturers.
The head features a tilting stand mount and operates on mains power from 100 to 120 VAC. Use the built-in 2.4 GHz Wireless X System with TTL trigger X1 and remotes XT 16 or FT 16 to control power, modeling light, and triggering.. The system offers 32 radio channels and 16 groups. With fast recycling and flash durations, the SK 400 II provides 0.4-3 seconds of recycling time and flash durations from 1/800 to 1/2000 seconds.
Output ranges from 1/16 to 1/1 over 40 steps for power adjustments. The 150-watt modeling light features three modes: Off, Proportional, and Percentage (5 to 100%). The intuitive interface includes a keyboard and multi-function buttons, while the LCD screen clarifies all settings and functions accessible.
Key Features
- 400Ws, 5600K Color Temperature
- 0.4-3 Sec Recycling
- Flash Duration: 1/800 to 1/2000 Sec
- Optional X1, FT-16, XT16 Transmitters
- 100-120 VAC
- 1/16 to 1/1 Power Range
- 150w Modeling Lamp
- Anti-Pre-flash Function
- Umbrella Input and Stand Mount
This light is truly amazing and is sure to do wonders for you! If you’re considering getting more lights or any photographic equipment in Pakistan, feel free to check out Golden Camera. We’d be delighted to assist you!
Benefits Of Using A Softbox
Read about the benefits of using a softbox:
Best For Portrait Photography
Use three softboxes for portraits. Position the main light high, aligned with the model’s nose, to reduce side shadows. Place one softbox under the chin, one to the side, and one above. A white backdrop may appear gray in images due to the softbox focusing light on the subject, a common effect for corporate headshots.
Professional Online Videos
A softbox lighting kit is key for great videos on vlogs, YouTube, or tutorials. Lighting options like the Spectrum ‘Illuminate Mate’ kit are fantastic for video production, featuring a ring light that serves as your key light, while the two softboxes deliver a beautifully even fill light from both sides.
Try positioning your softboxes just above and to the side of your subject for a lovely, natural look! If you’re in the mood for a more “surreal” effect, feel free to angle the lights toward your subject instead. Position the ring light directly in front of your subject for best results. Shooting through the center works well, too!
Beauty Portfolio
Lighting plays an essential role in capturing stunning makeup photographs. Softbox lighting kits help makeup artists and hairstylists improve image quality with even lighting. Additionally, positioning a ring light a few feet away from the subject’s face helps achieve optimal results, avoiding harsh shadows while illuminating the features beautifully.
Snap-on orange filters are an excellent choice to warm the skin tone and create a more inviting glow. Thoughtful consideration of lighting techniques can elevate the artistry of makeup and hairstyling photography, making a noticeable difference in the final presentation.
Final Thoughts
A softbox is indispensable for photographers and videographers seeking soft, controlled, and professional-quality lighting. If you’re shooting portraits, recording videos, or capturing product shots, the versatility and effectiveness of a softbox make it a worthy addition to any setup. With various shapes, sizes, and accessories available, you can tailor your lighting to suit any creative vision. Mastering softbox techniques opens the door to endless possibilities, helping you achieve beautifully lit images every time. Start experimenting today and see the difference for yourself.
We know that you are pretty much convinced that you need a softbox for your projects. If you’re thinking about getting a softbox for your equipment and are eager to upgrade your gear, you’re in the right place! You can get a great price on a photography softbox in Pakistan right on our website.