Blog
How to use Lightroom Classic: Polish your portraits to perfection
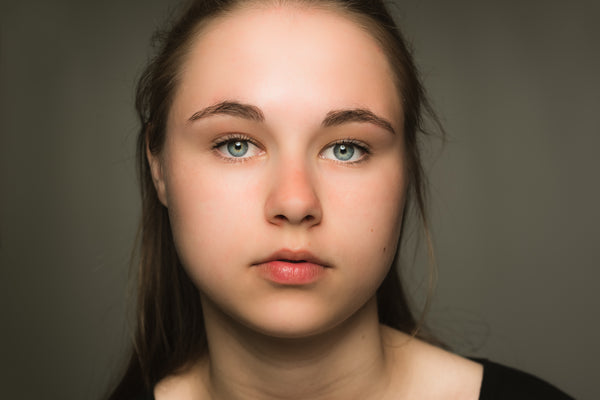
With Lightroom Classic CC hear how you can use the Spot Removal tool to polish skin to perfection
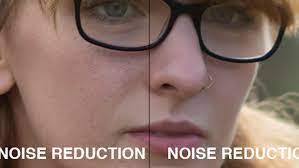
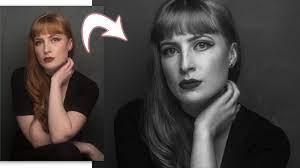
There is a great opportunity to capture good portraits this summer. And, if you want to your images to enchance, you can learn to retouch the skin is one of the best skills. Fortunately there is a method in Lightroom that is effective, fast, and also very simple.
In Lightroom Classic there is a tool – Sport removal, with which there is an easy way to edit blemishes or flyaway hairs. This tool can be a lifesaver when an amazing portrait has some little imperfections to be improved. This is handy for removing dust spots from landscapes, too!
Spot Removal tool replaces any flaw that you use with a different part of the image that has been selected automatically by the software, still you can manually reposition the area if it does not seem right. Lightroom has 2 main options: Heal and Clone, which helps in controlling the type of selection. It can be refined by adjusting the feathering , size, and opacity.

Color calibration
If your phone is not color calibrated, so we need to check the white balance on my computer. Though you can use desktop Lr for this, but it is easier to edit white balance in LrC, because mouse scroll wheel can be used to make adjustments fine.
In LrC fine-grained editing is generally easier across the board: Maybe it’s just me, but I can’t get Lr to use my mouse wheel to edit settings when I hover and scroll. This is such a time saver!
I miss you, color labels.

Color labels
Secondly, Lr has no color labels. Why, Adobe, why?! Color labels are so useful for marking finished edits (green), black and white virtual copies (yellow), Instagram crops (purple), preview photos for social media (blue) and photos that need Photoshop editing (red). It’s a major pain point for me that Lr doesn’t include this level of custom filtering.
Virtual copies
On a related note, Lr makes virtual copies hard. For starters, you can only create virtual copies on the desktop version: The option doesn’t exist on mobile. Versions is the Lr alternative to virtual copies, but this doesn’t work for me.
Can you imagine editing over 600 wedding photos in black and white and having to manually switch every single one from color to black and white for exporting? No thanks. In LrC I can duplicate the entire color batch, label the copies yellow, filter the set so I can only see yellow-labeled photos and apply the black and white edit across the set, before exporting everything in one fell swoop.
Custom export presets
Speaking of which, being able to save export presets is another essential feature missing in Lr. Custom name codes and saving to a designated folder automatically are key parts of the export options for me, as is exporting multiple presets at once.
While we’re talking about presets, I love that LrC can save metadata presets to apply across whole batches of photos. You can select a batch and manually type in the metadata in Lr, but you can’t apply a saved preset with one click.