creative photography techniques

5 Must try creative photography techniques

Explore some new techniques to shoot that will open your imagination and expand your photographic skills.

‘Creative photography’ is the term often used now and it is not only a cliché, but it is now hard to know what creativity actually means. Some photographers find blurred ‘abstract’ shot creative, while for others it is a badly exposed picture.

Here are five creative techniques you must try; with some, you can capture with just a kit lens and your camera, while a few require specific software, lighting kit, or filters.

5 creative photography techniques

Forced perspective

This forced perspective works when objects in your frame look like they are different in size from than the actual objects, because of the camera angle or distance that you shoot them.

Start by finding foreground and background, they are two points of interest that work together to create size illusion. A foreground object can be any subject that works according to your needs, or you use your fingers to hold subjects in the distance.

Freeze-frame action

Taking shots that are too fast to be seen with normal eyes can have some fascinating results. But freezing these rapid motion requires a more technical approach, and the results will be worth your effort to do so.

A freezing frame needs set up in which a subject and sound trigger in a darkened room should be present. Shutter speed should be set to a long exposure (it doesn’t matter how long the exposure is).

Motion BlurCamera trick levitation

Several aspects and approaches can take to capture edgy levitating shots, but we have approached with the simplest here, as there are no complicated or strings edits involved. You can fix your main camera in the same position on a tripod, and you will need to take two separate shots.

Stroboscopic motion

Stroboscopic motion effect created by a pulsing flash captures multiple times during freezing points, and long exposure as the subject moves. A dark space, a tripod, and a speed light that has a Multimode or Stroboscopic are good to try.

Set your camera on a tripod in front of your object, and a Speedlight on a side, then switch to manual mode. It is good to start with the exposure and shutter speed of around one second, ISO 100, and an aperture of f/11.
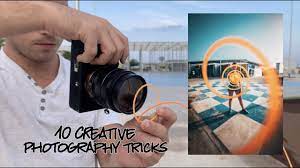
Repeating illusion

This inception-style picture within one frame is easy to create, whatever the scene is. You will just need two cameras – one to shoot the image with and one as a prop.

It’s easy to add another image onto the camera screen once you have taken a starting image of the back of your camera. Photographer named Louis Stacey duplicated the layers in Adobe Photoshop software, then used the Pen tool and Layer Mask to cut the camera screen. He resized the image with the duplicate layer underneath so that you can see more of the camera on the screen.


Photo website

Build a photo website from scratch: Show case your portfolio

Are you looking to create a new photo website, we have explained in detail and a step-by-step tutorial to help you do this.

Building a photography website might be a tempting thing as creating a photo website will take much more time than the usual website but it will be a better option to showcase your portfolio.


You can use picture-sharing websites such as Flickr or 500px, or you want to create your own website from scratch in WordPress or Drupal, everything you need to create a fantastic photo website is mentioned.

AssetPart 1: Choose a photo-sharing site

Consider using a photo-sharing website rather than spending your time tinkering around in the back end of a website. Just like social media platforms, for example, Instagram is ruled by algorithms, and websites such as 500px, Flickr, and others can give your pictures a better opportunity to be explored. As well as, photo-sharing websites can make your portfolios better, enabling users to check your work easily.

Part 2: Build a photography website in WordPress

WordPress is a super easy-to-use and user’s friendly CMS (content management system) if you are looking to create your website. It means now you can build your own photography website without having to spend much time on building each different element. Many see WordPress primarily for bloggers, but photographers can also take advantage of this system is a great way.

Part 3: Build a photo website in Drupal

Why not consider building your own site on Drupal if you like the idea of popping up the hood on your photo website. This is a one-step-ahead from creating a website in WordPress, but in this way, your efforts and time will be rewarded with ultimate customizability. Also, Drupal is free to use as it is an open-source CMS.


USING IMAGES ON YOUR WEBSITE


Using the wrong sized images can affect the performance of your website drastically? Also keep in mind  that most images are subject to copyright and its not a good idea to use them.

If you are not good in calculating your KB from your MBs, your JPGs from your PNGs, or your pixels, then no issues! We have some tips for you.

Image has to be downloaded in your computer when you visit a web page in your browser. If there are five photos on the page of 100 KBs each, that is 500 kilobytes that equates to a lot of traffic on the way.

How do I make it right?

AssetAfter reading above mentioned tips now you know how important it is to have correctly sized images and good quality images on your website. Questions is how do you go about making that happen?

These 4 things you need to know about creating images online:

  1. Where do I find images?
  2. What should be my image size?
  3. How can I minimize the image size?
  4. What to do with them now?

Where do I find images?

Select ‘Search tools’ from the menu bar in the Images tab of Google and you will see a menu for ‘Usage rights’, there you can find free images without breaking any copyright laws.

Asset

What should be my image size?

There are 3 things to consider when it comes to image size:

  1. dimension: 300 x 400px
  2. resolution: the number of pixels packed into a set space
  3. file size: measured in KB and MB

How can I minimize the image size?

By this step, you have found the image you want to use and edited it to the correct size. Still, if the image size is big? then the panda is here – TinyPNG.

What to do now?

Asset

Finally, your images are here that you want to use, resolved all copyright formalities, re-sized them correctly, and optimized them for the web, Now what?

In a WordPress blog, you will need to import your images into your library. Now select Media and Add New and use them everywhere on your website.

For more details or guidance please contact us or drop your valuable comment.