food photography

6 Must-Have Food Photography Props to Give Your Images Something Extra

When it comes to photographing your food, it’s all about setting the “right” scene. If you want your honey-baked ham or apple pie to make your Instagram followers salivate with envy, well then expert food photographer, Andrew Scrivani has a few tips & props that will make your shots really look like you know what you’re doing.

Ideal food photography props need to walk the line between neutral and nondescript, and personality-based and playful.

“You don’t want your propping to distract from your food,” explained New York Times contributor Andrew Scrivani in his essential class, Food Photography, emphasizing the importance of neutral props and props which don’t compete with the color or texture of your food.

That said, it’s worth acquiring some versatile, beautiful pieces to keep around, just in case. These staples, which will add something to a future shot (even if you’re not sure quite what yet), are, says Andrew, must-haves for any food photographer.

“Anything that catches your eye as interesting or may fit into your workflow at any point is something worth keeping.”

You may also need to do a little bit of repurposing, says Andrew, who “has gotten some great props from the garbage.” So when you’re shopping around for food photography props and pieces for the studio, remember to look for what a piece could be, not necessarily what shape it’s in right now.

Here are a few props to keep an eye out for when stocking your food photography studio.

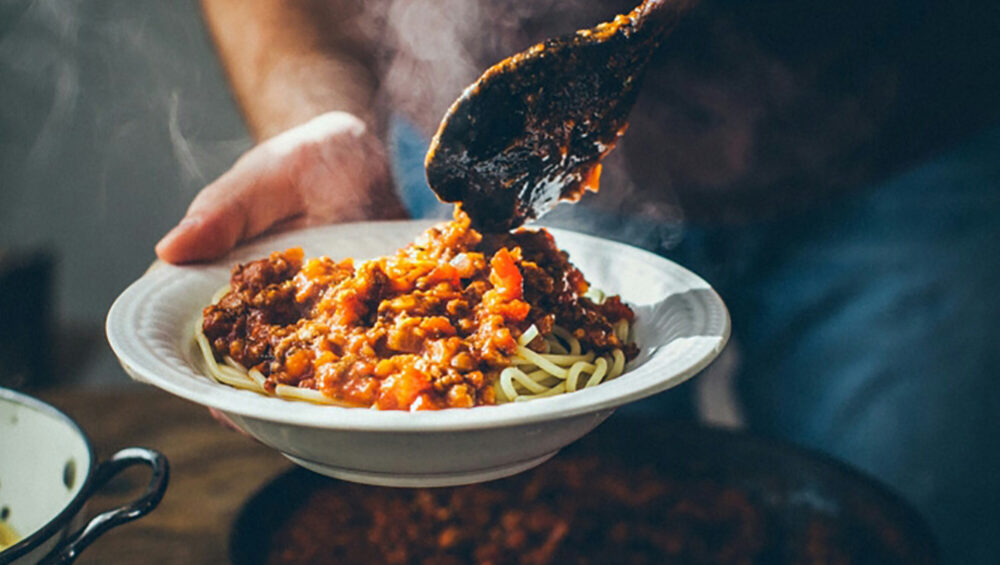
Solid, neutral serving items

A white dinner plate. A silver platter. A beige soup bowl. These staples are so important because they’re both versatile and they aren’t distracting.

“You want to use things that are able to be used over and over again. You always want to keep it neutral so that it doesn’t challenge the food,” says Andrew. “The majority of the time, the food is the star.”

Look for hearty dishes or other serving items that can display a lot of types of food, with shapes that are easy to work with


A really gorgeous cutting board

Finished food is great to photograph, but preparation is also important. People like to see food in action, and food being handled or manipulated. A wooden cutting board is essentially a neutral surface but adds an element of movement or change. Prop your in-the-works food with a utilitarian knife and you’ve got a classic shot.

A surface that does the work

Andrew uses the same piece of marble, which he got for $20 from a junkyard, for many of his images. Almost purely white (but not totally white), it’s so important that “if I could ensure it, I would.”

“I put things on top of it, instead of moving it” Andrew explains, because it’s just so functional.

There’s no need to drop a lot of cash on these kinds of surfaces; beat-up door panels, old tiles, and just about anything else that at one point might have been used in home repairs are all fair game. Find a surface that you can lay on top of any table, whether it be a piece of concrete, a chunk of marble, or any other neutral foundation and you’ll have a tool you can use for years for any number of shots.

A “panic button” dish

Sometimes, the food is not the star…because the food is not particularly star-worthy. When you’ve got unattractive or unappetizing food (it happens!), Andrew says it’s best to have some dishes or utensils that are so beautiful, they make the entire shot look like fine art. If you’ve ever been truly struck by the beauty of a bowl or the curve of a glass, keep it!
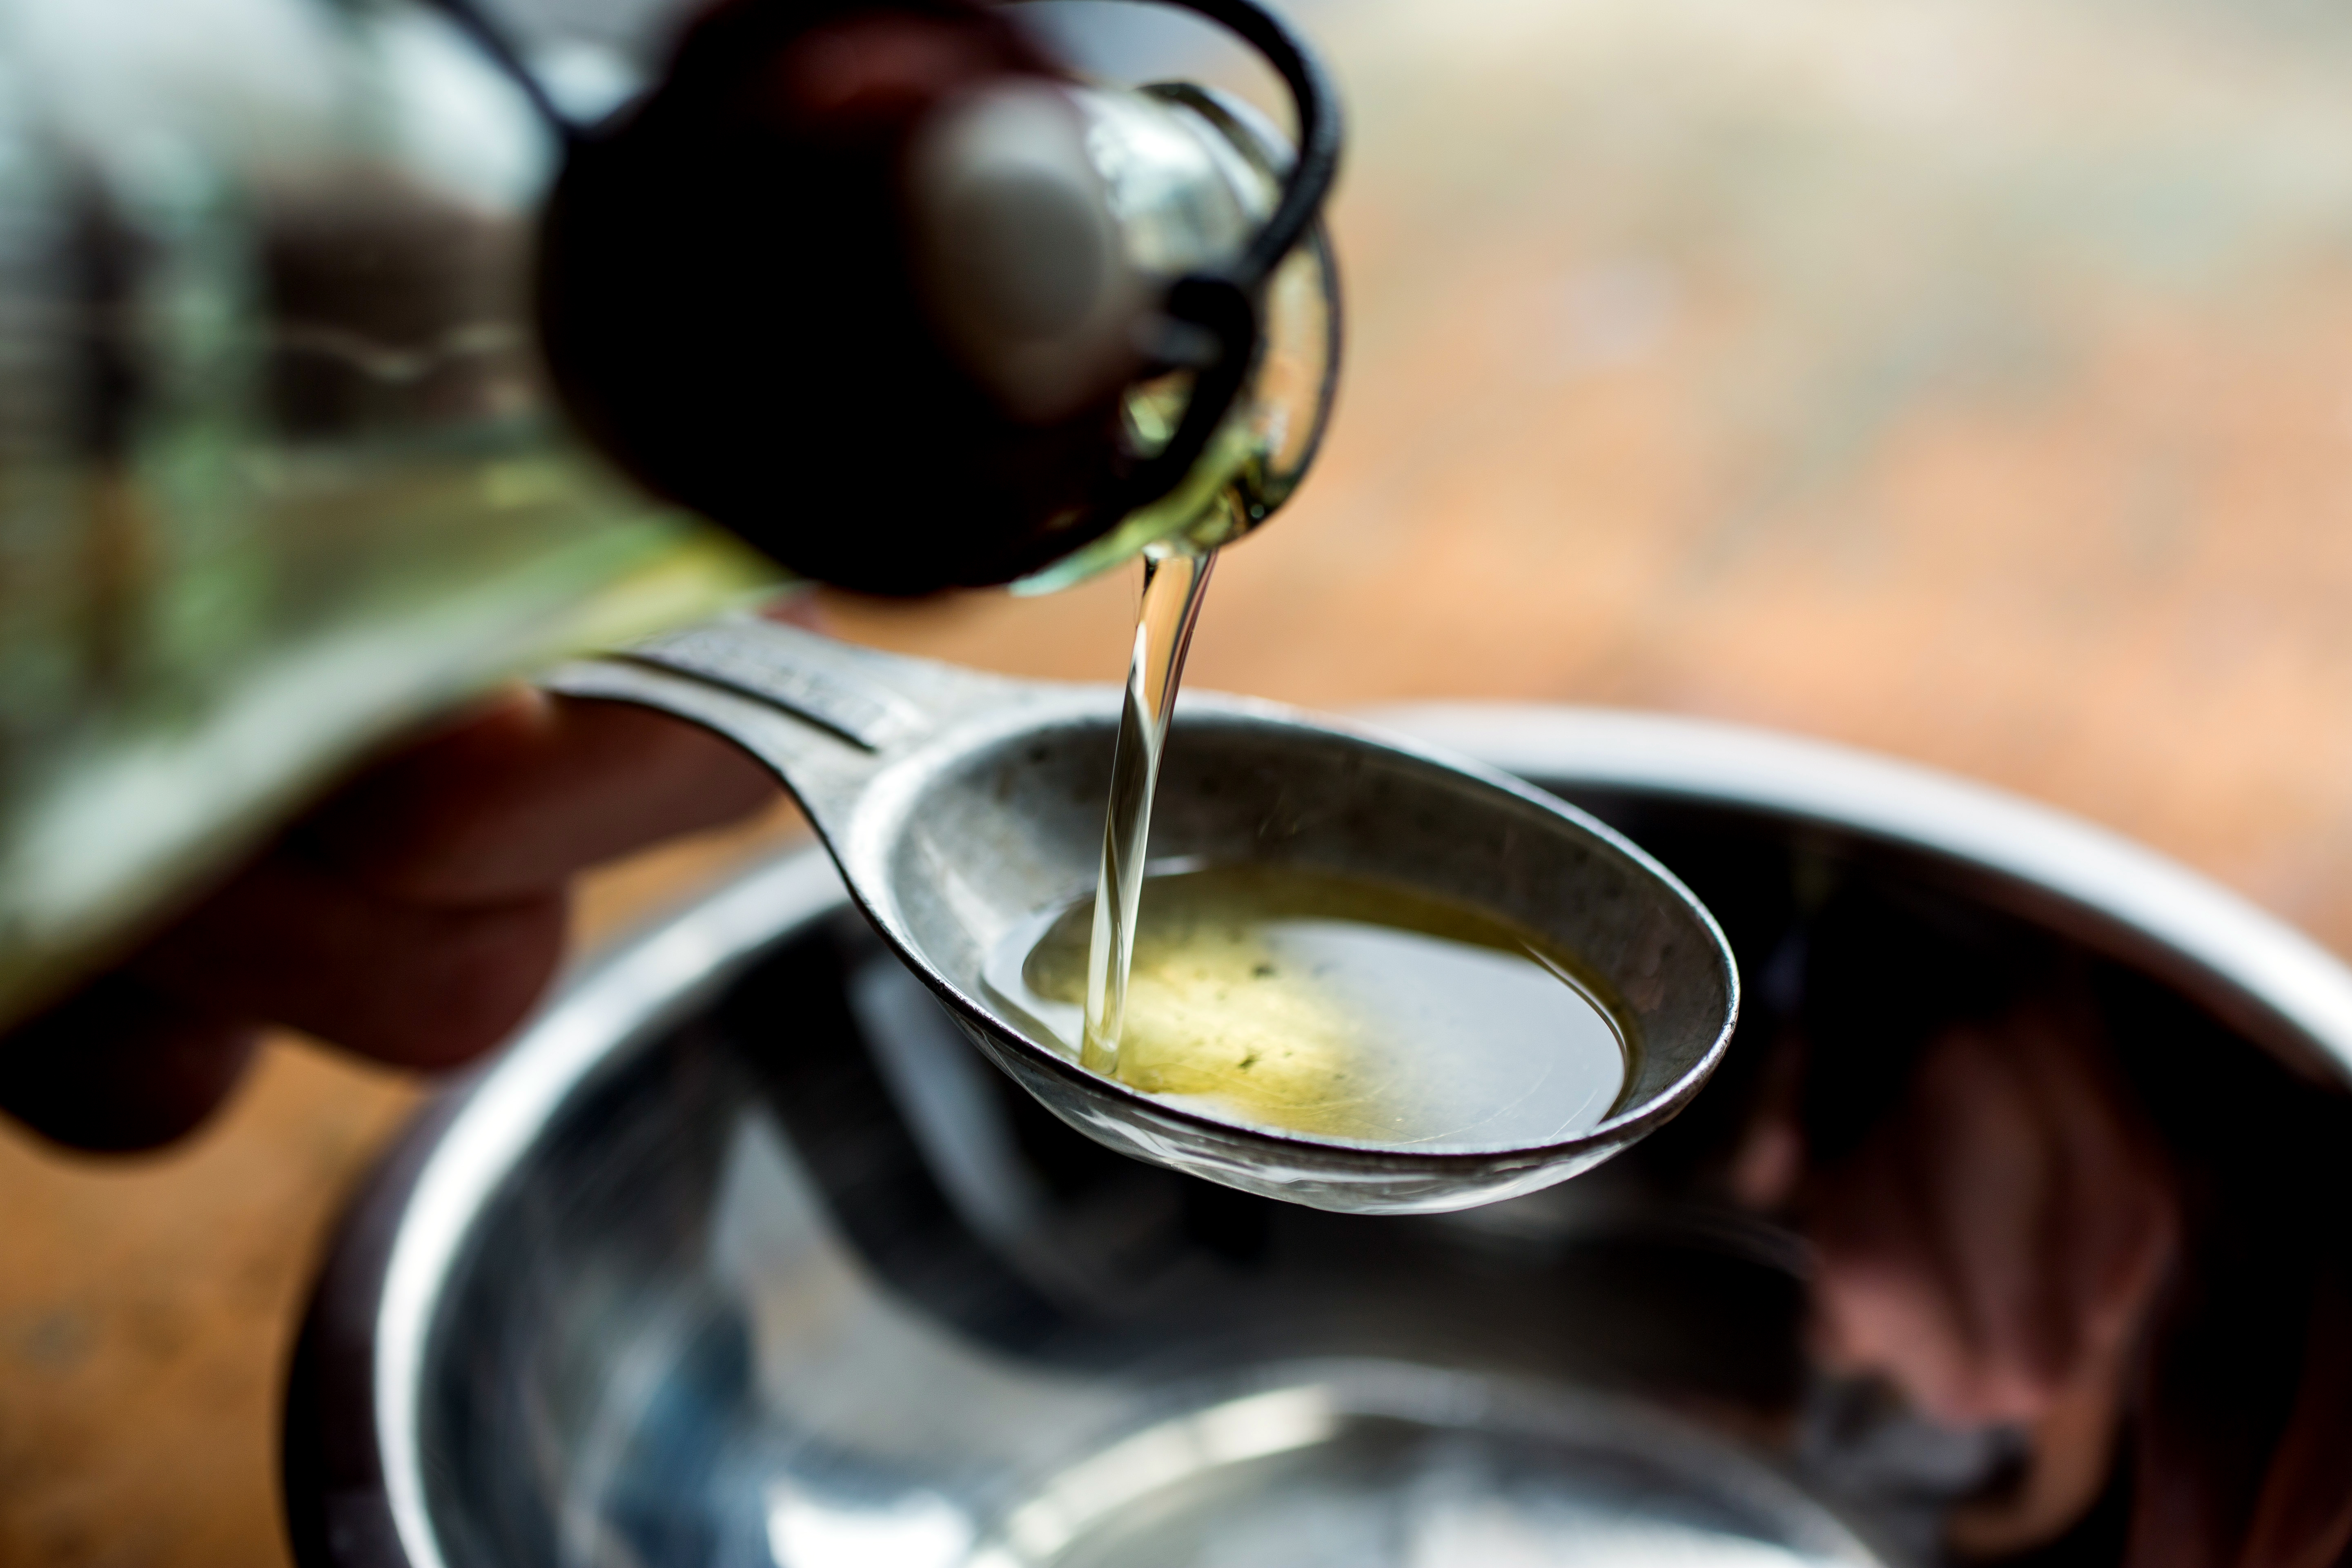

Food basics

Pepper, flour, sunflower seeds — these extras can be great props themselves. Stock your food photography studio with some seasonings and other edibles that can make otherwise bland or textureless food come to life. These items are inexpensive, shelf-stable, and can add a lot of intrigue to what might have been quite mild-looking.

Linens that lend a sensibility

We’ve covered the hard pieces, but what about the soft? Dishcloths and other textiles can help not only add color or texture to an image, they can also give the picture a sense of place, time, or emotion. Gingham looks like a picnic, a white napkin is high-class, and a slightly-used dish towel says “work in progress” and also “hand-made.” Used under a plate or off to the side, linens can be hugely useful in your studio — plus, they’re easily laundered and reused.

A personal piece that you really love

Food isn’t your only passion — and you want to make sure that comes across in your photos. Andrew says that one good goal is to “show that you have a range of interests.”

When it's done right, food photography can be a truly gorgeous art form -- and a big part of good execution are props and plating. Learn more from Andrew Scrivani on the CreativeLive blog.

“Not everybody has the same aesthetic,” explains Andrew. Whether it’s family heirlooms or funky flatware you picked up at the flea market, keeping around a few personal items is great for your branding and your unique images.

Photography Tips For Capturing Authentic Holiday Moments

From capturing the food to showcasing the decor, from snagging a quick family portrait to freezing that sparkle in grandma’s eye, Thanksgiving is ripe with creative possibilities for photographers.

But add in a group of people who haven’t see each other in a while, social distancing, indoor lighting, and eating entirely too much turkey, and Thanksgiving photography isn’t exactly simple point-and-shoot photography. To make the most of the holiday, we’ve put together some photography tips to capture the best memories of the day.

Don’t forget the behind the scenes

The camera shouldn’t stay tucked in the bag until that dinner call. What happens pre-turkey often makes up many of the family memories. Record Grandma making her infamous recipe, the mid-cooking jokes, and all the work that goes into that big meal. 

Find a window

Thanksgiving photos are often tricky because, frankly, November is too cold to eat a nice dinner out on the patio in most areas. Indoor lighting means using wide apertures and higher ISOs, but you can also improve your shots by using natural light from a window.

Look for details.

What are your favorite memories of Thanksgiving? Often, the smaller details make up some of that list. Take a macro shot of the whipped cream curling on top of that pumpkin pie. Create a still life of that gravy river through mashed potato mountain. You can’t photograph the smell of Thanksgiving, but you can get pretty close to capturing the sense of it by getting up close.

Watch for distractions.

The little things make great photos — and they also break them. Check the frame for anything distracting from the subject. Adjust the table setting to get a shot that focuses on just one element. Move the dirty dishes out of the background. Work to make sure everything in the photo is supporting the main idea rather then taking away from it by moving objects, adjusting the crop, or changing the angle.

Capture the not-so-perfect.

Distractions are one thing, pretending you have a magazine-worthy family Thanksgiving every year is another. Maybe family tradition requires that someone always burns those rolls. Maybe (or rather, probably) the kitchen looks like a war zone at the end of the meal. Capture the tears clinging to eyelashes when the toddler can’t eat dessert first. Maybe the dog makes off with one of those rolls. You’ve captured the food, now capture what makes that day belong to your particular family.

Mix it up with different angles and focal lengths.

I know it’s hard to move around with all that tryptophan pumping through your system, but avoid shooting every photo from the same height. To create variety, shoot from different angles. Shoot that food photo from both that popular top-down spread and using a side angle. Get a tall shot of everyone around the table, and an eye-level shot of family members together. Changing the focal length, if you use a camera with interchangeable lenses or a zoom lens.

Capture what you are thankful for.

Thanksgiving photos don’t necessarily have to be about turkey, cooking, and family gatherings. Try a different angle on Thanksgiving photography and photograph what you are thankful for. Maybe that’s a person (or people). Maybe that’s an item that’s important to you. Or, maybe you’re thankful for something a little more abstract. Ideas that aren’t things are tricky, but with some creativity, you can capture that abstract thing you are thankful for.

For more guidance and details please contact Golden Camera experts.

Canon EOS 700D vs Nikon D5300

We compare the Canon EOS 700D to the Nikon D5300: Which digital camera has the better sensor? Which has the better viewfinder or monitor? Which is faster?

Both cameras belong to the Amateur DSLR category.

For a more detailed size comparison, see the section further down below.
Canon EOS 700D vs Nikon D5300: Specifications at a glance

EOS 700D

Introduced in March 2013
Amateur DSLR
Sensor: APS-C
18 megapixel
5 frames/second
100 – 12800 ISO
1920 x 1080 Video
Viewfinder: Optical (Penta mirror)
76.00mm (3.0″) Monitor, articulated
Lens mount EF, EF-S
No WiFi
133.1 x 99.8 x 78.8mm³ (5.2″ x 3.9″ x 3.1″)
580g (18.7 oz.)

D5300

Introduced in October 2013
Amateur DSLR
Sensor: APS-C (DX)
24 megapixel
5 frames/second
100 – 12800 ISO
1920 x 1080 Video
Viewfinder: Optical (Penta mirror)
81.00mm (3.2″) Monitor, articulated
Lens mount F
WiFi built-in
125.0 x 99 x 76mm³ (4.9″ x 3.9″ x 3.0″)
530g (17.1 oz.)
EOS 700D vs D5300: The sensors

Both cameras use the same sensor format: APS-C (called DX by Nikon). This infographic highlights the sensor areas of both models compared to other common sensor formats:

EOS 700D vs D5300: The viewfinders

The EOS 700D uses an optical viewfinder with a penta mirror. The viewfinder covers 95% of the field of view and has a magnification of 0.53x.
The D5300 features an optical viewfinder with a penta mirror that also covers 95% of the field of view, its magnification is c. 0.55x.
This infographic illustrates the viewfinder magnifications of both cameras. The black area represents a magnification of 1x, corresponding to natural size; indicated in red is a magnification of 0.85x, the highest value in a any camera on the market today.

Sensor size is generally a good indicator of the quality of the camera. Sensors can vary greatly in size. As a general rule, the bigger the sensor, the better the image quality.

Bigger sensors are more effective because they have more surface area to capture light. An important factor when comparing digital cameras is also camera generation. Generally, newer sensors will outperform the older.

For more information and guidance please contact us.

Studio portrait lighting: essential tips and setups explained

Want to shoot professional-looking portraits? Here’s how to get to grips with a basic home studio kit.

Studio lighting can seem daunting if you’ve never tried it before. However, it’s not nearly as scary as most people think. By using a simple home studio kit, with just a couple of flash heads and a few basic accessories, you can get great results in no time at all. In fact, here’s one of the best photography tips: it’s arguably easier to use a studio lighting setup than a speed light. 

While these are a great starting point, it’s best to experiment. So if you’re working in your own home studio, don’t be afraid to tweak these setups.

Studio setup

Light stands

Studio flash is all about positioning the light source away from the camera, so stands are crucial. They support the flash heads, which means they can be positioned at the right distance and angle to the subject. 

Flash heads

Most kits have two flash heads. Along with a flash tube, there’s a modeling light. Most have a switchable ‘slave’, enabling one flash to be triggered by another, so you only need to have your camera connected to one of the heads.

Umbrella

A brolly is the most standard form of lighting accessory. The flash is directed into the brolly so the light is reflected back onto the subject. They are available in different reflective surfaces – typically white, silver or gold. 

Softbox

Softboxes are slightly more sophisticated than brollies and, once you’ve worked out how to assemble these tent-like devices, they create a softer and generally more flattering light, with more even illumination. 

Snoot/honeycomb

Both of these tools help to concentrate or ‘focus’ the light. They’re ideally suited for use as backlights or for isolating a particular part of an image.

Reflector

A simple reflector can be really useful in a studio lighting setup, especially if you’re only using one light. You use it the same way you would with natural light – to bounce light back onto your subject and fill in any hard shadow areas.

Rembrandt

Position one flash head with a silver brolly at a 45° angle to the model at about six feet high. This creates a strong, hard, direct light from the side and above. This is called a key light. To even the lighting, position a reflector on the other side of the model to bounce the light back into the shadow side. There should be a small triangle of light on the subject’s face – this is referred to as Rembrandt lighting.

Kit needed:
• One flash head
• One reflector
• Two light stands 

Clamshell

This setup is great for beauty images as the lighting is flat and even. It’s pretty easy to achieve this effect too – all you need to do is place two softboxes on either side of your subject at the same angle and at an equal distance. Set the power so it’s the same from each light. Try using a reflector under the face – your model should easily be able to hold this. This will bounce light up and onto the face.

Kit needed
• Two flash heads
• Two 66cm softboxes
• One reflector
• Two light stands

Rim lighting

Place both lights slightly behind the subject, pointing back towards the camera. This setup requires some tweaking and can work really well with nudes as it helps define body shape. You’ll need to watch out for lens flare, though, as the lights are pointing back towards the camera. A set of ‘barn doors’, a lens hood, or a shield can help prevent this. An assistant who can hold a carefully positioned reflector is useful – this will help fill in those areas of deep shadow. Advertisement

Kit needed:
• Two flash heads
• One reflector 

Things you need to Make Money from a Drone

One of the best things about a hobby like photography is the ability to take on a few freelance assignments and make the gradual transition to being a professional. Drones offer a similar route, but if you are going to make money from a drone there are a few rules and regulations that are unique to flying cameras.

If you’re taking the step from hobby to an income stream, there are a few things you’ll need to add to your flying bag, which we’ll look at below. Even the best drones need know-how, a degree of skill, and knowledge of the law.

The first question you need to ask yourself is “Do you have what it takes to be a pilot?” If that sounds a bit macho, worry not – this isn’t about doing loop-the-loops and pulling a 5G turn without emptying your stomach. What professional pilots really have to deal with is checklists, regulations, and communication.

Below follows a list of what you’ll need, rounded off with a list of professional drones you might soon find yourself wanting as you extend your client base.

Pilot Training

In most countries, you’ll need to be able to prove to the local aviation authorities that you’re a capable pilot before accepting commercial jobs. In fact with all drones over 250g (8.8oz) the chances are that you’ll need to at least register your aircraft, so you’ll probably already be somewhat familiar with your aviation authority.

You might think you can comfortably fly your aircraft – in fact with GPS switched on it’s not especially difficult – but that’s only part of the puzzle. You’ll also need to understand all the relevant air law which, as you can imagine, is both extensive and always subject to review and updates. Aviation authorities like the FAA and CAA produce and update a good deal of this and, while they’re certainly not the enemy, they do have a lot to worry about; airliner certification, government lobbying, and much else besides. By its nature, this is bureaucratic and complex.

A good trainer will put a human face on all this for you, and you should be looking for an organization you can build a relationship with. They will remember you, and help you keep your paperwork up to date. Budget for annual renewals or re-training as qualifications are updated. In the UK, for example, the current PfCO will change to a new system, called the GVC in July 2020, but what re-training is needed won’t be known until May. This kind of change is happening in every jurisdiction, and you need to monitor it, or work with someone who handles that for you.

You can find what to do next at the FAA Become a Drone Pilot page in the USA. In the UK look for a Full NQE which can carry out the training and exams, like Fly Icarus.

Airspace charts & apps

With every individual job, you’ll need to know whether you can take off at all. Your training will tell you how to read the aviation charts, but you should still pick up a printed one for your bag. As a drone pilot, you’ll be flying VFR (Visual Flight Rules), so it’s these charts you need.

In the US you can get your local FAA Charts: VFR from Amazon. In UK and Europe look for the Rogers VFR charts.

As a backup, it’s also useful to use an App which can provide live data. Great examples are 

• NATS Drone Assist (UK) or
• B4UFLY (USA). 

These have the advantage of accessing NOTAMs (Notice to Airmen), which warn of temporary restrictions (from cranes or air shows, say).

Insurance

Commercial liability insurance is a necessity, and the market has got options for those working full time or operating more casually, with most offering the choice between monthly renewing policies and flexible per-flight protection. What you’re insuring against, for the most part, is the damage you can be responsible for with your aircraft (liability), which explains why the ‘basic’ cover protects you for a million or more in that category. Despite the high liability numbers, you may find the ‘Hull’ cover doesn’t cover the cost of your aircraft and equipment unless you spend a little more – be sure to check your policy. 

UK pilots look at Moonrock Insurance and Flock (who have an app which can give you a live risk-metric and quote based on your choice of aircraft, location and time). 

Battery safety

Lithium battery fire caused by short circuit test by the University of Maryland.

It’s just as important (and, in most places, just as compulsory) to ensure that your batteries cannot start a fire when they’re not in use. Damage can take some time to reach combustion, so you should always keep batteries in a fireproof container known as a “li-po bag,” in essence a fireproof blanket in the form of a bag. 

High-Vis Jacket

It has to be said that high-visibility goes two ways. On a busy site, you certainly want to make sure you’re seen by others operating dangerous equipment – indeed it might well be a requirement – but at the same time there are risks to drawing attention to yourself if the public can stray near. Once you’ve taken off, you don’t want interested members of the public disturbing you, however enthusiastically, so a vest with Do Not Disturb is a nice touch.

Hyperfocal Distance and Depth of Field Explained for Landscape Photography

Get nearby objects and distant horizons sharp at the same time using this depth of field and hyperfocal distance tips.

Most photographers love landscape photography, as it gives you a chance to get out into the countryside with your camera, but it can often be hard to get scenic shots that are as sharp as you want. It is not just a matter of setting a small aperture and using a tripod, you need to take full control of the depth of field.

• Landscape photography tips and techniques

Depth of field is the range of sharp focus in front of and behind your main subject. With a shallow depth of field, the background quickly goes out of focus. This is great for shooting portraits, for example, where you want to concentrate attention on your subject. However, in landscape photography, the whole scene is your subject, and you want as much depth of field as possible, to make everything in the picture sharp, from the flowers and stones at your feet to a distant treeline on the horizon.

A number of factors affect the depth of field. The focal length or zoom setting of your lens is one. A wide-angle setting will give more depth of field, while a telephoto setting will give less. The lens aperture is a factor, too. Wide lens apertures give a shallow depth of field, while small apertures give more depth of field. 

A lot depends on where you focus. If your subject is right up close to the camera, the depth of field will be quite shallow, but if it’s further away, the depth of field increases. Like a lot of photographic theory, it all starts to make more sense when you actually try it out and you can see the results in your photos. 

And there is a way to make the depth of field much simpler when you’re shooting landscape photographs. It’s called the ‘hyperfocal distance’, and it’s explained in depth at the end of this tutorial. 

1. The effects of zooming

If we shoot this scene with our Nikon D3100’s standard kit lens at its widest focal length, there doesn’t appear to be a depth of field problem at all – everything is sharp. But if we zoom in to the lens’ maximum 55mm focal length, we can now see that only our subject is sharp, and both the background and foreground are blurred.

2. Switch to Aperture Priority

We like this composition, and using this longer focal length is the only way to get it, so if we want more depth of field we’ll need a smaller lens aperture. If you’re shooting in P (Program) mode, the camera chooses the lens aperture and shutter speed automatically, so what you need to do is switch to A (Aperture Priority) mode instead.

3. Change the lens aperture 

Now turn the main command dial to choose the aperture setting. This is displayed either on the status LCD on the top or the main LCD on the back of the camera. We’ve set the aperture to f/16 here. You could set it smaller, but the picture quality starts to fall off due to ‘diffraction effects’.

4. See the difference

At f/5.6, the widest available at this zoom setting, both the background and the plants in the foreground are out of focus, but at f/16 much more of the scene comes out sharp. However, we can extend depth of field even further by adjusting where we focus…

5. Maximise the depth

The trick is not to focus on either the foreground or the background. If you focus on the foreground, the background will go out of focus, and if you focus on a detail in the background, the foreground will be blurred. To make both come out sharp, you need to focus between them.

6. Choose your focus point

There are two ways to do this. One is to leave the camera set to autofocus, but manually position the focus point. You may find it easier switch to Live View mode and use the multi-selector to place the focus point where you want it – it should be roughly one-third of the way up the frame.

7. Check the figures

Or you can switch to manual focus and use an app like Field Tools to work out the hyperfocal distance. This places distant objects at the far limit of depth of field, and so maximises the depth of field. At a focal length of 55mm and aperture of f/16, our app says we need to focus at 9.5m…

8. Set your lens

For this you need a lens with a distance scale. Not all lenses have one (the Nikon 18-55mm kit lens doesn’t, for instance), but many others do. Use your judgement if the markings are far apart – depth of field calculations make it sound like a precise science, but the sharpness falls away slowly, so you don’t have to be ultra-precise.Advertisement


To Be Or Not To Be – In A Film School!

There comes a time when new filmmakers wonder whether or not they should have enrolled into a film school. And believe me, everyone goes through this phase. You could be an expert at what you do, but it would have still occurred to you.


“Where could I have been had I enrolled/not enrolled into a film school?” I’ll be very honest till last year, this thought hit me very strongly, at least once every 2-3 months (which is a lot!). I have invested 4 years of my life into a film school, practicing theory with little to no commercial/on set experience and trying my hands on dozens of student projects.


The learning has been undeniable, but I sometimes wonder if 4 years was a little too much, if I had taken too long to finally step into the field… but again, now that I work as a lecturer (Film and TV) at a prestigious university I understand we all have different learning paces and not every kid can be the same. And with this understanding I can teach better, so every time that I interact with my students, I fully understand how important it was for me to go through the process and for them to go through it too.


When it comes to a film or art school in Pakistan, it’s never the school that will teach you how to film, it will always be you and how far you are willing to go. It will be your onset experiences, nothing beats the thrill and learning of the sets. There are multiple tutorials out there available for the newer generation of film makers and we at Golden Camera have decided to give you one of our top picks every week! Because to truly become a film maker/ photographer you constantly need to come up with ideas and concepts that are out of the box, alongside some great equipment (we are now going to do both for you!)

So it doesn’t really matter if you went to a film school or not but here are the Pros and Cons of going to one just so you know what you’re missing out on.

Pros –


1. Networking! (Your network is worth your net worth, you will make your life long crew here and know their talents and capabilities as you grow over the years with them.)
2. Formal education (A degree to testify for your talents will come in handy in situations such as the current pandemic hit, just in case you need to settle down for an office job, also this will count for years of education.)
3. Teachers (You will learn in person from some of the most accomplished and not so accomplished professionals in the field. You will have the opportunity to learn from their mistakes, failures, successes and even get hired by them as teachers tend to see great potentials in their students.)
4. Competition (The competition in a FilmSchool classroom is so immense, but it prepares you for what lies ahead in the field. This is truly one of the greatest advantages of being in a film school!)


Cons –

1. It’s expensive (You can invest the same money getting some great gear from a trusted site)
2. You will miss out on a lot of practical learning while you opt for classroom learning. (but you can always strike a balance, some of the students already have jobs… but they are not film jobs for film sets do not leave you with enough time to be able to pursue formal education)
3. Even though film is a creative medium and what you will create will have to come straight out of your heart but most of the time preference will be given to those with a relevant degree unless your work beats all odds! Set your heart to it, and go get them tiger.
Stay connected with us for more fun and informative pieces to help you grow as a film maker.

Rode NT-USB

Best Microphones for Recording Video

Choosing the best microphone for recording video is crucial. If the audio in your video is poor quality, viewers will drop off very quickly.

Having the right microphone for recording video is a good place to start. But how do you know which microphone is going to serve your needs best with so many options to choose from? With this in mind, we wanted to know how different microphones stack up against each other.

So we tested 18 different microphones from brands like Blue, Rode, Shure, Sennheiser, and Audio Technica to see which are the best microphones for recording video.

The Recording Studio Set-Up

We wanted to test our microphones in a fair and consistent way. Below is a list of what we kept consistent for each recording:

The microphones were plugged into a 2015 Macbook Pro running MacOS Sierra 10.12.3 with the sound input level set to 67%. We did not adjust the level in order to keep the level consistent across microphones, and to mimic the plug-and-play experience a USB mic provides.

XLR microphones were plugged directly in a Zoom H4N digital recorder.

Recordings were taken directly from the SD card used in the device.

The same levels were used across all XLR microphones.

Microphones using an ⅛ inch jack were plugged into a Behringer Xenyx 302USB, which was plugged into the Macbook Pro.

Gain was set to the midpoint, with the EQ set even at zero for the Low and High. Mic level was just shy of the midpoint.

Same voice over talent for all recordings, which was Andrea Perry & Ryan Knott for the English voice overs, and Lars Grosspietsch for the German voice over. We also wanted to capture the difference between male and female voices.

Best Microphones for Recording Video – Our Top 5

We selected the following as our favorite microphones for recording video based on the test recordings we made. Check out our results below.

1. SE Electronics sE2200a II C Large Diaphragm Cardioid Condenser Microphone

This XLR mic isn’t a name that will roll off the tongue. However, this microphone has a great overall sound for both a male and female voice. Coming in at $280, it is well worth its value. The Microphone is an XLR microphone, and it needs to be powered.

This means you must have a mixer that provides power and accepts an XLR input. For Andrea’s recording, we felt like we needed to add a little bit of low end (bass). We tested adding bass in a different recording through a mixing board and felt it enhanced the quality of the mic even more.

2. Audio-Technica AT875R Line + Gradient Condenser Microphone

This XLR microphone was a surprise performer during our tests. This microphone has a small stature, but a great sound. As a shotgun mic, it has a line and gradient pick-up pattern.

This means it rejects a lot of noise from the side and is very directional.If you have someone controlling the placement of the mic, this is a positive. However, if you have an individual that tends to move as they talk, this can affect the recording.

3. Blue Yeti USB Microphone – Silver

The Blue Yeti is a USB microphone and has a price tag of $129. This microphone has a good sound and picked up minimal background noise in our quiet environment.

If looks matter and you want to impress your colleagues and boss, the Yeti is an impressive (and hefty microphone) and would be first on the list. The Yeti also offers a few different options not provided by the previously-mentioned microphones, including a switch for various polar patterns.

In addition to four polar patterns, there is also a 3.5-millimeter headphone jack that allows you to monitor the input of what you’re recording in real-time. Our only frustration was it wasn’t easy to mount to a mic stand. You can easily remove it from the provided base, but the size of the mount for the Yeti didn’t match our microphone stand.

4. Blue Snowball – USB

The next microphone on our list is the Blue Snowball. Overall, we did a lot of comparing of the Snowball to the Yeti, and the Snowball wasn’t too far behind. Coming in at around $69 dollars, it’s definitely a great microphone for anyone on a tight budget.

We really like that the Snowball had good volume to it. Given that we set the input and kept it consistent, some mics were pretty low and difficult to hear, but the Snowball had a lot of volume.

5. Zoom H4N Multitrack Recorder

The Zoom H4N is a very different type of microphone. It is both a microphone and a recorder. You can use it to record sounds, voice-overs, and interviews directly to an SD card, or you can plug in and record from up to 2 XLR microphones. Since we have a Zoom, we thought we’d give it a try as a standalone microphone.

The sound quality is pretty good, although it did pick up a lot of popping sounds during the voice-over. This problem could be remedied with a pop filter.

Overall, the Zoom is a versatile device that can go anywhere you go. On video shoots, we plug a wireless lapel mic directly into the camera, but set up the Zoom with another mic (usually a shotgun) to get a second audio source.

Also, there is a new version of the H4N available, which boasts of newer better microphones, among other features.

Honorable Mention:

Sennheiser EW 112P G3-A omni-directional EW System

If you’re looking for a wireless pack, and have a bit of a budget, we really like this Sennheiser.

Wireless microphones have two components: the transmitter and the receiver. The Sennheiser has a small battery-powered receiver that you can mount to a camera, or easily keep out of the way. Other wireless set-ups have a base station that needs to be plugged in and usually isn’t convenient if you’re out and about.

Final Thoughts

We talk a lot about audio being a critical part of your videos. And it’s true, bad audio will make bad videos. A good microphone will go a long way in helping you make better productions.

But it’s not the only piece of the puzzle. Remember to control the noise in the location (e.g.turn off overhead lights that buzz, turn off the HVAC.)

Finally, learn about your microphone and how to get the best sound out of it, and take the time to learn how to adjust it. It will be well worth it when your audience listens to your sweet audio as they watch your videos.

DJI FPV Drone Release date, First Rumors & Features

DJI (Da Jiang Innovations) is a Chinese technology company that invents outstanding innovations worldwide. As we know, DJI launched various drones, and its most notable innovation is DJI FPV.


FPV is one of the fortunate FPV combos with an FPV drone, remote control, FPV goggles V2, and all required cables and one battery. The first actual thing is that it can shoot 4K videos up to 60 frames per second and shoots 1080p at 120 frames per sec, which is an unusual creature in it. The great thing related to DJI FPV is that it is going to work out of the box. It will work with just Charge DJI FPV goggles V2, install the DJI Fly app, and update the firmware. Then it’s ready to fly. And is significantly upgraded to all the DJI drones. It’s awesome to hear that it has inbuilt different flight modes.

Preferring a drone camera can definitely be challenging, but we provide a remarkable DJI FPV price in Pakistan. Whenever you are outside shooting the wide landscape, DJI FPV will be the best suite according to its specifications.

First Rumors of DJI FPV

As it’s clear that every modern technology is going to be released, lots of rumors spread through insiders of the company. It is believed that the DJI FPV drone is certainly a neat consumer-level FPV drone. That is also the wandering rumor that the goggles provide reliable long-distance low latency transmission.

The DJI FPV is also the first integrated FPV drone that allows pilots of all abilities the choice a flight mode that matches their skill level. Modes include:

Normal (N) Mode: During N mode operation, DJI FPV operates similar to other DJI drones, hovering in place with the use of GPS and/or visual positioning systems (VPS) on the bottom of the drone. The most approachable flight mode, N mode allows for obstacle detection sensors on the front to be activated to warn when obstacles are near and slow down. Pilots are tasked with maneuvering the drone away from any detected obstacles.


Manual (M) Mode: Take full control over the drone with M mode which is designed for more experienced users. While in M mode, all sensors and hovering features are disabled.


Sport (S) Mode: A new hybrid blend of M and N mode, the S mode offers some of the dynamic movement capabilities that come with M mode along with some of the key safety features of N mode. S mode is the middle step between the three modes and developed to give pilots more room to explore their skills as they get accustomed to the drone.


The most exciting rumor that has been leaked about DJI FPV is about its controller. It is been assumed that it looks like the FPV’s remote control might rely on new technology to control the drone. Instead of using controller sticks, the drone would be controlled by how the remote control is moving through space.

One of the biggest rumors is that we can easily connect more than one to eight goggles with one drone. So more people can easily share the pilot’s view. DJI high-performance motors that can easily take their standstill to 100kph just within two seconds.
DJI FPV has three modes: Normal mode, Manual mode, and Sport mode. DJI also records 4X slow motion in 1080/120p. DJI FPV Video can be saved in H.264. Apart from the rumors, It will have an auto-land feature

DJI FPV Additional safety features

When DJI introduced drone automatic breaking to their Phantom range, it was a major innovation and probably one of the drones’ biggest safety updates. 

Due to the unprecedented speeds achieved with the FPV, new emergency brake and hover features have been added. 

GPS-based geofencing has been enhanced, advising pilots of airspace restrictions and potential hazards; this will also automatically prevent drones from flying near certain high-risk locations, such as airports.

A relatively new addition to the DJI drones is the AirSense ADS-B receiver which automatically alerts pilots if planes or helicopters are close by.

Safety of drone use is a huge priority for DJI, and the enhanced emergency brake and hover, ADS-B, VPS, failsafe return and geofencing are all designed to ensure that the DJI FPV is as safe to fly as possible. 

Features

  • It has three flying modes that make it suitable for users of all ability levels.
  • DJI FPV can fly at the speed of 25 mph in windless conditions.
  • Shoots good quality 4K and 1080p footage.
  • It also has a 12MP ½.3 inch CMOS sensor.
  • The camera gives 14.66mm similar lenses with a 50-degree area of view and also a
  • fixed f/2.8 aperture.
  • DJI FPV is just a little lighter than the DJI Mavic 2 Pro.
  • Goggles v2 furnishes reliable, low-latency transmission

DJI FPV Price & Release Date

The DJI FPV drone price tag will be £1,249 / €1,349 for the drone, remote controller 2, FPV Goggles V2, cables, and one battery.

The DJI FPV Fly More Kit is priced £259 / €279 and includes two additional batteries and a dedicated charging hub. You can also buy a separate Motion Controller for £139 / €149.

There are lots of rumors about the DJI FPV release date. However, the DJI FPV is released in March 2021. It is clearly observed that the price just depends upon the unique features of their outstanding specification.

best drone in pakistan

The 10 best camera drones in 2021: drones with built in gimbal cameras

These are the best drones for aerial photography and videography, both for cameras and flight controls.

Drones have equal appeal for amateur photographers and filmmakers, offering a unique view of the world never before possible. Intelligent flight controls make drones far easier to fly than any regular aircraft as they are almost foolproof by comparison. Perhaps the greater difficulty is navigating the various drone regulations in different territories, particular around commercial filming.

In USA, Europe and China any aircraft over 250g (8.8oz) is subject to a compulsory registration scheme (and since the start of 2021 in the UK the rules now apply to any flying camera, whatever the weight). And even if you’re just a recreational drone pilot, new regulations from the FAA in the United States require you to take a TRUST test in order to get a certificate you may be required to show officials.

The best drones have evolved greatly since the first ready-to-fly model went on sale ten years ago. Every drone on this list  has a camera supported by a powered gimbal, which counteracts the vibration from the propellers and changes in direction by the aircraft. Sensor size is still an issue for photographers, but there are different options depending on your needs. In general, the bigger the sensor, the better the low-light performance.

Piloting has also become partly optional; Tesla-like A.I. is making collision avoidance, object tracking, and automatic quick shots a common feature. The skydio 2 with 45-megapixels of cameras devoted to its artificial brain, promises to be the most intelligent of them all though is still almost impossible to find in the shops. 

Some drones still lack a full set of smart flying features (even if fitted with landing sensors). You need to remember not all drones can see obstacles in every direction – even if they fly in any direction! Nevertheless to make this list, drones feature technology allowing them to hover in place, so photographers can view using them as more as like positioning a tripod without legs than going to pilot school.

In 2021, the major excitement has been with the arrival of the DJI FPV Combo  – which brings sports drone photography using goggles to a much wider audience. And then there was the arrival of the DJI Air 2S, which is far more than just an update and creates its own new niche. 

To come, we are also expecting Sony to arrive with its first Airpeak drone, whilst Ring is promising a home security camera that flies around to keep an eye on your possessions.

The best drones in 2021

DJI Mavic 2 Zoom

The all-round best drone DJI Mavic 2 zoom for photography

Weight: 905g | Dimensions (folded): 214×91×84mm | Dimensions (unfolded): 322×242×84mm | Controller: Yes | Video resolution: 4K HDR 30fps | Camera resolution: 12MP | Battery life: 31 minutes (3850mAh) | Max Range: 8km / 5mi | Max Speed: 72kph / 44.7mph

DJI Air 2S

DJI’s new drone DJI Air 2s combines a pro-quality camera with a compact frame

Weight: 595g | Dimensions (folded): 180×97×77mm | Dimensions (unfolded): 183×253×77mm | Controller: Yes | Video resolution: 5.4K: 5472×3078 @ 24/25/30 HDR | Camera resolution: 20MP | Battery life: 31 minutes | Max Range: 18.5km | Max Speed: 68kph/42mph

Autel EVO II

With 8K video, this might be more than you need!

Weight: 1174g | Wing span (unfolded): 397×397mm | Controller: Yes | Video resolution: 8K @ 25fps | Camera resolution: 48MP | Battery life: 40 minutes | Max Range: 9km / 5.5mi | Max Speed: 72kph / 44mph

DJI Mavic 2 Pro

A brilliant camera in a quality package

Weight: 907g | Dimensions (folded): 214×91×84mm | Dimensions (unfolded): 322×242×84mm | Controller: Yes | Video resolution: 4K HDR 30fps | Camera resolution: 20MP | Battery life: 31 minutes (3850mAh) | Max Range: 8km / 5mi | Max Speed: 72kph / 44.7mph

DJI Mini 2

The best drone for the beginner is DJI Mini 2

Weight: 249g | Dimensions (folded): 38×81×58mm | Controller: Yes | Video resolution: 4K 30fps (1080P@60fps) | Camera resolution: 12MP | Battery life: 31 minutes (2250mAh) | Max Range: 10km / 6.2 miles | Max Speed: 57kph / 35.7mph

DJI Mavic Air 2

If it’s a foldable drone you want in 2020, DJI Mavix Air 2 is the best

Weight: 570g | Dimensions (folded): 180×97×84mm | Dimensions (unfolded): 183×253×77mm | Controller: Yes | Video resolution: 4K 60fps | Camera resolution: 48MP | Battery life: 34 minutes (3500mAh) | Max Range: 18.5km / 11.4mi | Max Speed: 68kph / 42mph

What to look out for in a drone

GPS:
Toy drones generally don’t feature GPS, but if you’re composing photos it’s nigh-on essential. The positioning technology was developed with guided missiles in mind, so ideal for drones. Unlike a missile, though, the aim is to stay very much in the same place, rather than be pushed away by the breeze. Not only is piloting easier, but it enables automatic return to the take-off point should the drone lose contact with the pilot, a useful backup.

Controller:
Not all controllers are created equal. Most feature the twin sticks but at the lower end they’ll use standard Wi-Fi with a range of around 100m control and video feedback with a clear line of sight. Higher-end drones make use of proprietary radio systems, like DJI’s Lightbridge, with a range of 4000m (2.2 miles), support for master & slave controllers (enabling separate pilot & camera operator) and first-person-view goggles.

Camera & gimbal:
Like any camera, sensor size and megapixels matter, but so too does the means of vibration reduction. At the lower end, cushioning or some kind of digital image stabilization works, but the best systems used motorised gimbals to steady and level the camera on 2- or 3-axis. 

Battery:
Battery capacity is the key limit in flying drones. Higher capacities don’t always make for longer flight times since overall weight (not least the battery’s) and efficiency are a factor. The much more useful measure is simply minutes of flight time. Lithium batteries store a lot of power, but “Intelligent Batteries” are safer and include built in monitors so you can easily check their charge.

The App:
The quality of the manufacturer’s free app is a big part of the experience, since many features, especially on higher-end drones, will require you to dig down through menus. Taking the camera beyond auto is certainly done this way. Cunning developers have also found ways using the drones sensors and the app’s processing abilities to create easier flying modes and awesome visual effects like DJI’s Tiny Planet selfie clip, just one of the “Quickshot” options.