Creative photography

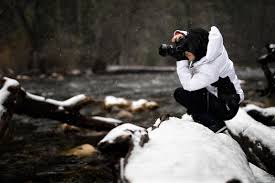
Creative Photography You Can Do At Home

There is nothing better to practice photography skills at-home. There are lots of ideas you can experiment with, and with some basic equipment, you can really work wonders. Let’s get into it and discover some creative photography ideas you can work on at home, and work into a series of images.

Photographing water Droplets

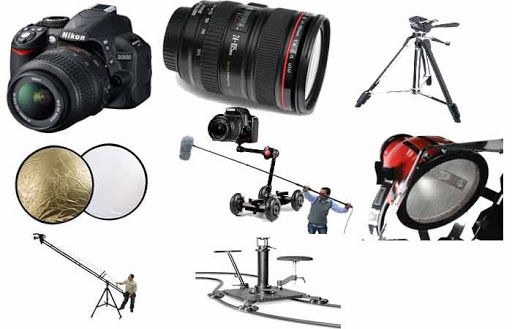
This is a classic project that you can try at home. It is also relatively simple to set up, though you will need some specialized photographic equipment.

The equipment needed here includes a camera with a macro lens, a tripod, and an off-camera flash. You will then need to set up a location where you can drip water into a bowl of water.

Food photography

Everyone loves to practice food photography, especially when the food looks amazing! This genre is huge, and potentially lucrative, as the images you take could be sold as stock.

So what are some of the things that can lead to successful food photography in the home? Take a look at this list, but for a more detailed guide take a look at this article.

Lighting – This is key to good food photography. Natural light such as window sidelight works well. If you use off-camera flash, the light should come from behind the food, but be sure to reflect the light back to avoid shadows in your photo.

Backdrop – Standard still life backdrops like photographing the food in a light box can be effective. Otherwise, make sure the background provides context to the food you wish to photograph.

Food layout – Make sure your food is well presented. The best professional food photographers use food stylists, so see how you can produce something with style. The use of repeating elements is one potential solution here.

Lensball light painting

A lot of Lensball photography will be carried outdoors, however, the Lensball is an excellent still-life object too.

One popular indoor project for Lensball photographers is light painting. You will need a dark room, tripod, and sheet of glass to go on the table as your initial setup.

Freezing Objects in ice

A fun project to try when you have a bit of time at home is freezing objects in ice. You will need a few days to complete each photo since there is a process involved in freezing an object. The main thing you need to achieve is getting the object to freeze in the middle of the block of ice.

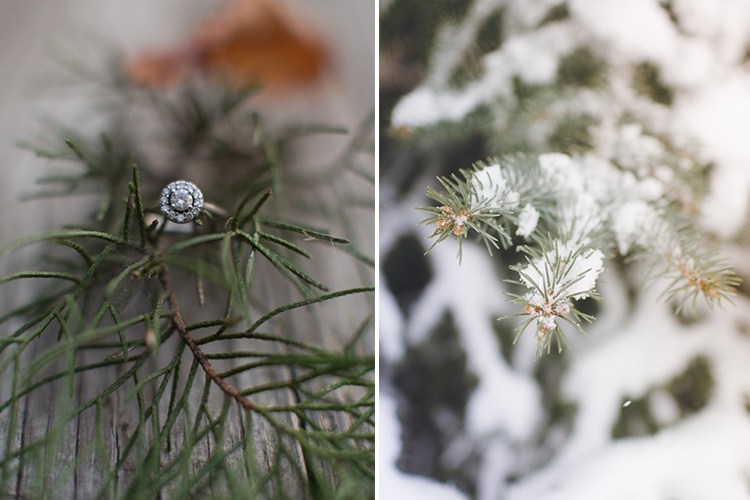
Still life photography

Once again, this is a huge genre in photography. The most professional photos will always have good lighting.

This style of photography could dovetail nicely with another hobby you may have. For instance, if you’re a quilter, photographing your finished product is a great idea.

If you want to get the best out of your still life photography then you can learn more by reading this article.

Mixing oil and water

Another of the at-home creative photography ideas involves getting into the science vibe with a bit of hydrophilic and hydrophobic action.

That’s mixing oil and water and then photographing the resultant oil “bubbles.”

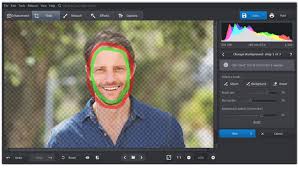
Learn a new post-processing skill

One of the more obvious candidates for at-home creative photography ideas is post-processing.

Everyone knows this is a vital aspect of photography, it’s basically the new darkroom. Yet investing time in learning new post-processing skills when you’d rather be outside photographing? Well, if you have to be inside, then learning some new post-processing skills is a great idea!

Digital blending – A great technique to learn for landscape photographers, you’ll learn some key Photoshop skills like layer masking through learning this procedure.

Cloning – Whether it’s cloning an object out of the image, or cloning yourself multiple times, this is a great skill to learn.

Sharpening and softening – An essential skill for portrait photographers to learn. Sharpen the eyes and soften the skin for best results.

Which of these at-home creative photography ideas will you take on?

With time at home, it’s a great chance to take up an indoor photography project. Have you ever tried any of these at-home creative photography ideas yourself?

As always, please leave your thoughts and comments below, and if you have any query please contact us.

Photo editing

How to do a convincing head swap in Photoshop?

Swap faces and capture everyone’s best look

Sometimes a photo is perfect, except for that one face. They might be blinking or making a funny face, ruining an otherwise amazing shot. But if you have another photo of them, you can swap out a blinking face for a warm smile. A face swap is a great way to fix a family photo, for example — edit photographers need to make all the time. 

Even if you’ve never seen what’s trending on social networks like Snapchat you’ve probably seen selfie face swaps, face swap memes, or even mind-boggling celebrity deepfakes, fake videos of well-known figures. Novelty face swap apps are a dime a dozen on Android and iOS, but face swaps can look better than those done on a free app for iPad or on smartphones. With Photoshop, no one will know your sister didn’t smile for the family photos. There are several methods for doing a professional-level face swap with Adobe products.

Face swapping with mask layers.

If you have photos of similar size and composition, it’s easy to layer them on top of each other in Photoshop for a basic face swap. Just follow these steps:

step

Set the face you want to swap in as a bottom layer, and the picture with the face to be replaced as the top layer.

step

Line up the faces in the two pictures. Use the Auto-Align feature and make sure that the two figures you want to join together roughly align.

step

Add a white mask layer onto the top. Set the opacity to 100%.

step

Select the Brush tool. Set the opacity to 100%. A softer brush style tends to work well for this kind of work.

step

Using the black brush, paint over the face you want to swap out on the mask layer. As you paint over the mask layer, the face beneath it will show through in real time.

This method works with pictures that are roughly the same size and composition. Sometimes, though, you want something a bit more complex, such as a cat face swap or trying your hand at a new face swap meme. For those moments, you’ll need to explore a different set of Photography skills.

Face swapping with Object Selection

Photoshop’s Object Selection tool lets you grab whatever you like from a photo. You can use it to grab a single feature, like an eye, a nose, or an entire face or head. Using the Object Selection tool you can cut out the face you want to swap into an image. When you do, save it as its own layer.

Blending and color-correcting a face swap

The lighting and skin tones of people’s faces can vary wildly, and sometimes one person’s look can change across different photos. You’ll almost certainly have to correct for subtle differences between the two photos if you want your face swap to look professional.

Match the multiple skin tones with the Match Color feature (Image › Adjustments › Match Color), using whichever image you want to match colors from. Gradually adjust colors to match the skin tones together. Use the Blur tool to match the amount of blur on the head and face, and use Auto-Blend Layers with Seamless Tones and Colors selected to merge the face and body layer together.

Depending on your inclination, you can make the face swap subtle and natural-looking or over the top. Regardless of what you want to do, Photoshop provides the tools and flexibility to combine images in whatever way you need.

For these skills you need equipment, so buy the best products from Golden camera today!

Photography tips

Photography Ideas to Boost Your Creativity

Photography brings forth new opportunities to improve your creativity and skills, hone in on your craft, and who knows, even guide you in the direction of finding a new genre that you love more than anything in the world! Here are some creative ideas to take you out of your comfort zone, and guide you in your quest to boost your creativity.

Add emotion to your Images

Choose to evoke emotion in your images – either in the eyes of the beholder or in the eyes of the beheld. When you want emotion from your subjects, ask for it. There is nothing more uncomfortable for your clients than a photographer who is silent behind the camera while continuously clicking the shutter.

Go Macro

Traditionally macro photography has been associated with floral and fauna. But resist the urge to get out into the garden to find the smallest ant to photograph. Instead, think of macro as a great way to isolate details in an image.

Find Reflections

As the name suggests, try and find mirror images or reflections, either with mirrors or with water, of your subject and shoot creatively.

Shoot out of Focus

Whether it’s an unlucky accident or intentional, I love out of focus images. Remember these creative exercises are simply an attempt to create something you are proud of. There are no right or wrongs, they are all just ways to stimulate your creative juices.

Double Exposures

Ding a double exposure is a carry-over from the old film days and it is a super creative way to take your images from boring to wow! In its simplest form, it is a way to superimpose two images onto a single frame. The good news is that you don’t need a film camera to create double exposures.

Shooting through Objects

I love shooting through objects, it adds an element of interest and depth in the foreground. You can really take this up a notch by using every day elements like leaves, branches, fabric pieces and ever glass to create some cool artistic effects in your images.

Different Perspective

The next time you find yourself shooting the same subject the same way, take a step back and rethink your strategy. Are you a 100% vertical shooter like me? Then force yourself to take a horizontal frame. Are you always looking at details? Then use a wide-angle lens and force yourself to take in the big picture. Do you always shoot at a narrow aperture so as to get everything in focus? Then dial down your aperture and shoot at the widest possible setting (based on your lens) to focus in on one detail of the whole image.

Burst of Color

It’s a beautiful, colorful world out there. Get out and photograph it. Don’t be afraid of the bold bright colors, but definitely be aware of which colors work and which ones don’t quite translate well in imagery. Train your mind to look for certain colors and patterns and before you know it, you will have a collection of colorful images that make you happy.

Pattern Play

Take the time to look around and see if you are able to find any natural patterns around you. These can be either man-made or natural. Facades of buildings, windows, parking lots, and landscapes all provide many opportunities to capture repeating patterns. Capture them in an interesting way to highlight those patterns.

Conclusion

Wehope these points have proven that there isn’t any lack of creativity prompts in and around you. You just have to look for them anytime you feel stuck or find yourself creating the same or similar images again and again. Keep these prompts in the back of your mind, use them, combine them, mix them up – the possibilities are endless!

if you want more guidance on this topic, please contact our experts.

Tripod

How to Choose and Use a Tripod?

Camera tripod can make a huge difference in the sharpness and overall quality of photos. It enables photos to be taken with less light or a greater depth of field, in addition to enabling several specialty techniques. This tutorial is all about how to choose and make the most of your camera tripod.

A camera tripod’s function is pretty simple: it holds the camera in a precise position. This gives you a sharp picture when it might have otherwise appeared blurred due to camera shake. But how can you tell when you should and shouldn’t be using a tripod? When will a hand-held photo become blurred?

Common rule of thumb for estimating how fast the exposure needs to be is the one over focal length rule. This states that for a 35 mm camera, the exposure time needs to be at least as fast as one over the focal length in seconds. In other words, when using a 100 mm focal length on a 35 mm camera, the exposure time needs to be at most 1/100 seconds long — otherwise blurring may be hard to avoid. For digital cameras with cropped sensors, one needs to convert to a 35 mm equivalent focal length.

HOW TO CHOOSE AND USE A TRIPOD

Whether you are a pro who needs rock-solid support to eliminate shake, or a family memory-keeper looking to get better results in low light and more consistent framing, choosing the right tripod for your needs is key. Here are some tips to get you started.

Weight capacity (load) rating

The very first, and most important, thing you need to look at is the maximum weight load the tripod can bear.

Make sure it will hold more than your heaviest camera body and biggest lens combination. 1.5 to 2 times more than your camera weight is a good place to start.

Keep in mind you may lean on the camera, add a flash, a heavier lens, or battery grip at a later date so allow for some room to expand your system. Web sites for tripod makers are a good resource for this information, and a good camera specialty store should be able to provide this information for any of their tripods in stock.

Tripod legs

When choosing a tripod there are generally two types. Ones that come as a one piece package with the legs and head combined, and ones that you can select the legs and head separately.

I recommend the latter as you can mix and match (even from different manufacturers), or buy multiple parts and change the legs or head for different types of photography.

Within the legs alone there are also several choices: tubular legs with a twist lock vs ones with flip locks; how many sections are the legs composed of; maximum height of the tripod fully extended; and what material the legs are made from (steel, aluminum, carbon fibre or basalt).

Number of leg sections

This will usually vary between three and five.

More sections doesn’t necessarily mean the tripod will extend higher. There are several types that use 5 smaller sections which allow them to fold down to a smaller size, more compact for putting in a backpack or suitcase.

Look at the options and see which is the best fit for you taking all the factors into consideration.

Maximum height

If you are buying one with a head included make sure it comes up to at least your chin.

If you are buying the legs separately look for them to reach shoulder level or higher (legs only, not including extending the centre column which reduces stability).

Minimum height

Check to see if the legs fold down small, or splay out so you can get closer to the ground. This is handy for those down and dirty shots, literally in the dirt.

Weight and construction material

Once again you will want to choose the legs based on what you will do with this tripod most often.

If you do a lot of hiking into the bush, you will probably want to look at legs made of carbon fibre as they will are much lighter than the other options. It is also extremely durable and doesn’t rust. Carbon fibre however, does come at a premium price and they are usually the most expensive options and will weigh in somewhere between 3-4 pounds. Aluminum is next most popular but heavier than carbon fibre, averaging 5-6 pounds. Basalt is becoming more common and popular as it weighs in between the other two but carries a lesser price tag than carbon fibre usually. Shop around, but go to the store and feel the difference for yourself by picking a few up to compare. Get the one that is best suited to your needs and your budget.

Summary And Bonus Tip

  • Choose from either a one-piece tripod or modular first and decide what kind of tripod head you like best
  • Choose the legs and get the best you can afford (lightweight, sturdy, max-height, min-height) that fits your shooting style and needs.
  • Ensure both the legs and head will easily hold the weight of your equipment and then some
  • Bonus tip – get a tripod head with a quick-release plate system. This has a plate you mount to the bottom of your camera and just clips in and out of the tripod head easily. Allows for quick and easy setup and removal from the tripod.

For more guidance of tripod uses, please contact us.

Camera price in pakistan

What to do when you get a new camera?

Congratulations on getting a new camera, and welcome to the world of photography! You are definitely going to love it. Before you go out shooting, take a look at these things you should do first with your brand-new camera.

We also know how overwhelming it can be when you get that new camera in your hands. There are so many buttons, so many menus, a whole new language to learn, and that’s before you even take the first picture!

But don’t worry, we are here to help. Follow these simple steps and you will be well on your way to using that camera confidently.

Open the box

Sometimes just opening the box can be a little intimidating when getting a new piece of equipment. Take inventory of what is in there and make a list of things that you may need before you start taking pictures.

Most DSLRs will come with the camera body, a battery, charger, user manual, warranty information, and a bunch of protective packaging. Some cameras will come with a lens while others will just come with the camera body.

Pro tip: Keep all of the packagings in a safe place. Should you ever want to sell your camera (and you likely will one day!), having the original box will allow you to sell it more easily.

Read the Manual

It is not likely going to be the most exciting piece of literature you will ever read. However, your manual is the definitive guide on your camera. It’s worth spending a few hours to get to know your new best friend!

The manual will tell you how to safely use your camera, where to find specific functions, and will break down all those menus. You may even find that your camera can do things that you didn’t know it could do!

Surround yourself with Inspiration

One of the best ways to motivate your photography is to surround yourself with photographs that inspire you. Keep a Pinterest board of photographs you love and make notes on what you admire about each shot. Follow other photographers on Instagram. Keep photography books on your coffee table.

Of course, your first shots with that new camera aren’t going to look like the shots that you admire so much. Those photographers’ first shots didn’t look like that either! However, keeping beautiful photography around you all the time will help train your eye to see what makes a photo beautiful. This helps you as you seek out your own photo opportunities.

Get the Extras

Not everything you need to use your camera will come in that one box. You may need memory cards, a camera strap, a padded bag, extra batteries, and a lens!

Take the time to do some research on what items will work best for your needs. Memory cards, for example come in various sizes and speeds and you will want to make sure that the ones you get work well with your specific camera body.

We like to go to our local camera store when looking for all the extras as the staff there knows exactly what works and can point us in the right direction quickly. Bring your camera with you and they will set you up with everything you need.

Pro tip: Don’t be afraid to show a little personality! Items like camera straps and bags are where you can have a little fun with your gear and there are no shortage of styles from which to choose.

Start taking Pictures

Once you have your camera battery charged, your memory card in the slot, and a lens attached, turn that camera on and take some photos. Play with your settings and see what you can capture. These aren’t going to be the best pictures you ever take, but the best way to learn is to dive right in.

Practice picking focus points. See what happens as you switch through the various automatic modes. Try putting the camera in manual mode and see what happens. Keep a list of things that work and things that you find challenging.

Getting a new camera is so exciting and we want you to take pictures you love. We know that following these simple first steps will have you well on your way to capturing the world around you and we can’t wait to see where your camera takes you!

For guidance of camera equipment, please contact us.

Filmmaking gear list

Video Production Equipment and Filmmaking Gear Check-list

One of the most exciting aspects of starting filmmaking is putting your video production equipment together. Keep in mind, there is no “one size fits all” package for everyone as there are so many variables like budget, type of project, locations, pro vs amateur, etc so what we have tried to do in this article is to cover some basic gear you may want to consider.

Below is a video production equipment list for the filmmaker.

Video Camera

A video camera is the centerpiece of your filmmaking gear. What camera you choose depends on your budget, the type of shooting you are doing (static, stealth, run-and-gun, etc.), and where you plan to showcase your film (web-only, theater, broadcast, etc). You can shoot a documentary on anything from your iPhone to a DSLR to a top of line digital cinema camera. Whatever camera you choose, make sure you capture excellent audio. 


Tripod

tripod

A necessary piece of equipment to keep your footage looking steady and professional.

Get a tripod with a fluid head for smoother looking pans.   


Camera Light

Triopo R1 Round Head Camera Flash Speedlite

Sometimes a nice pop of light from the camera can help fill in ugly shadows. Camera light is a nice accessory to have especially in a documentary/news style shoot where you might not have time for a full 3-point lighting set-up.


Three-Point Lighting Kit

You only really need a lighting kit if you’re planning to do a lot of shooting inside. Creating a well-lit scene usually involves a 3-way lighting set-up. 


Shotgun Microphone

Rode NT-USB

Great audio often separates the pros from the amateurs. Having a shotgun mic prepares you for almost every situation. It’s perfect for setting on top of your camera or a boom pole.


Boom Pole

A boom mic set-up comes in handy to capture audio from a group interview, crowd scenes or any situation where you need to gather professional audio quickly. In addition to the boom pole (right), you’ll need a shockmount and a shotgun mic.


Shock Mount


Here’s the simple gadget needed to turn your shotgun mic into a boom pole mic. A shock mount keeps the mic steady on top of the pole and prevents the mic from picking up “bumping” sounds when the pole is moving around. 


Audio (XLR) Cables

If you plan to use a professional audio set-up with your camcorder, you’ll need XLR cables to go from your camera to the mic.  


Wireless Microphone

Sure, you can use a “wired mic” which is a bit less expensive, but I wouldn’t go on a documentary shoot without my wireless microphone. Unless you have an audio person who can hold a boom mic, this is the next best thing providing tons of flexibility for walk-and-talk interviews with your subjects. 


Portable Digital Audio Recorder


If you decide to shoot your documentary with a DSLR such as the Canon 5D Mark IV, it’s highly recommended that you either get an external mic or portable audio recorder such as the Zoom H5 (left).


Headphones

Getting great audio means monitoring the sound at all times while shooting. Find a good quality, comfortable set of headphones to make sure you avoid any nasty audio surprises when you get back from the shoot.


Light Reflector


This is a must-have item for your documentary filmmaking kit. A light reflector can turn an ugly amateur-looking shot into a golden and gorgeously lit scene. 


Lenses: Wide Angle, Clear “Protective” Lens, Polarizer, Zoom Lens, Macros, etc.

Have you ever seen those cool fish-eye scenes? That’s from using a special wide angle lens. If you’re shooting in super sunny situations, an ND filter or circular polarizer can dramatically improve the image. Or what about super close-ups of a bug or flower, that’s when you need a macro lens.

For guidance of video equipment for filmmaking, please contact us.

Basic Equipment for New Filmmaking Students

Basic Equipment for New Filmmaking

First of all congratulations on starting film school! You are probably already trying to figure out what equipment you will need to get started. Fortunately, most programs have many important tools available for students—namely big stuff such as camcorders and lights. Still, there are accessories, expendables, and other pieces of gear that you’ll want to have on hand or own yourself. So what exactly do you need to be prepared for film school? Luckily, not all that much.

What camera do I need?

To get started, you can likely get away with a camcorder, mirrorless camera, or DSLR with high-quality Full HD video capabilities. It is quite easy to get an inexpensive model with 4K video these days, so that is definitely worth looking into. If you are just starting your program and you are lucky enough to have access to great, modern cameras, then you should be okay getting something relatively cheap for your personal kit.

Lenses

If you’re buying an interchangeable lens camera, you can buy it with a kit zoom lens, or buy the body alone and choose lenses separately. For an APS-C camera with the kit lens, I recommend adding an affordable 50mm lens for low light shots and creative shallow focus.

Sound Equipment

Sound is as important as pictures, and you won’t get great audio with the microphone in your camera. Using a separate microphone will make a big difference. Lavalier (‘lav’) microphones, which clip onto clothes, are the most affordable way to get good sound.  Wireless lavs are great if you can afford them. You can also use a directional microphone on a boom pole.

You really need to be listening to the sound on headphones as you shoot. But some cameras have limited audio recording options – and no headphone sockets – so you may need a separate audio recorder.

Tripods and Camera Support

It’s important to keep your camera steady. Some cameras have very effective built-in stabilization, but most filmmakers use a tripod or monopod at least some of the time. If you want to be able to pan and tilt your camera smoothly, you’ll need a fluid head tripod. You can also get sliders (for smooth tracking shots), electronic gimbal stabilisers (for continuous flowing shots), and jibs (for vertical camera movements).

Lights and Reflectors

Once you start to get serious about filmmaking, you’ll want to control the lighting. You can use inexpensive five in one reflectors to enhance natural light. Basic work lamps are a good starting point for learning about creative lighting. For filming on the go, LED panels are the most convenient option, though good ones are expensive. For a budget studio setup, CFL soft box lights could be a good choice.

Editing

You can edit on Macs, PCs, phones or tablets.

Computers

I use Macs. They’re designed for video editing and widely used in the film and media industry.

You’ll get more for your money with a PC, but they aren’t as user-friendly and you’ll need to check that the spec is good enough to run your editing software. Video editing – especially 4K – takes up a lot of space and needs a powerful computer.

If you don’t need to be portable, a desktop computer will be better value for money than a laptop.

Storage

If you’re just doing small projects, you can keep all your video on your main system drive, but for large and more ambitious projects you’ll probably need external drives. Solid state drives (SSDs) are faster but more expensive than hard drives.

As always, you can ask any questions in the Comments section, below, and we will be more than happy to help you as you prepare for film school.

Photography equiments for bloggers

The Best Photography Equipment for Bloggers

Instagram, Pinterest, Facebook, etc. all of these social media platforms encourage visually creative and attractive images. To tie your brand and blog to the images you post online, you may decide to create these pictures and photos yourself. When it comes to blogging though, there are a few pieces of photography equipment that can really help in taking your photos to the next level. In this post, we are going to look at the best photography equipment for bloggers and how they make your pictures stand out from the crowd.

Best Cameras for Bloggers

The first thing you need in order to take a photo is a camera ofcourse. As I have already mentioned, this does not need to be the latest & greatest DSLR or mirrorless camera on the market. You could use your smartphone, a compact camera or a more affordable interchangeable lens camera.

If you’re looking to create some professional looking images at an affordable price, have a look at my guide to the Best cameras of 2021.

Most of these cameras feature an interchangeable lens, making them extremely versatile and for blogging that can be a massive advantage.

Best Camera Lens for Bloggers

If you decide on a mirrorless or DSLR camera, you are going to need a lens or two. Which lenses you go for all depend on what type of camera system you are using and what exactly you photograph for your blog.

This is a 50mm lens (or equivalent to 50mm if you’re using a camera with a crop factor) that has a wide aperture, and generally doesn’t cost an arm and a leg. The bonus of a wide aperture, like f/1.8, is that you can get some great bokeh quite easily.

Best Tripod for Bloggers

A tripod is one of those things that most, overlook when they are starting out and just get the cheapest tripod they can find as it’s just a tripod after all.

Whilst it’s true that any tripod is better than no tripod, a quality tripod from the get-go will save having to burn through numerous cheap tripods. This is especially true if you are on the go & take a lot of photos outside.

Best Overhead Mount for Bloggers

Ever wondered how bloggers get those awesome flat lay images with products and accessories scattered across a vintage wooden table? The easiest way is to use an overhead mount, like this one, on your tripod.

You will be able to take images directly above any products you may be reviewing, create seasonal flat lays as well as other flat lays for both your blog and social media. When it comes to flat lays, the options are endless.

Best Lighting Kit for Bloggers

Lighting up your images is by far the single most effective way to make your images look more professional.

A lighting kit, like this one, allows you to position and angle your light in a way that accentuates your subject. This kit in particular also comes with two soft-boxes that soften the light, giving it a much more pleasing appearance and reduces hard shadows in your images.

Best Diffuser and Reflector Kit for Bloggers

When it comes to lighting, natural lighting is pretty much always the best.

As I mentioned above though, it’s hardly something you can predict or control. This is why lighting kits are so important indoors. When it comes to outdoor use, however, reflectors can help you target that brilliant natural light right where you want it and illuminate your subject with some beautiful soft light.

CONCLUSION:

Whilst all this photography equipment can really help you take better images for your blog, having a look around your home and thinking a little bit outside of the box might be able to save you some cash whilst still being able to take some pretty awesome images.

Use your smartphone, improvise with white cardboard & duct tape to create a reflector and a tripod. Use a mobile app to control your camera, etc. Start off small or invest in one item to get yourself going. And like everything when it comes to blogging, just keep practicing and you’ll improve in no time!

For guidance of camera equipment for portrait photography, please contact us.

Choosing best image

Tips for Choosing Your Best Images

Making decisions is crucial to the art of photography. They happen after you press the shutter

Snapselect lets you quickly pick your best images by conveniently viewing similar images and duplicates. This can save you valuable time. But what do you look for when you are self-selecting it?

Making decisions is crucial to the art of photography (and many other things). A lot of decisions happen before you press the camera’s shutter. A lot of decisions happen after that, too. One of the key decisions is choosing your best images.

How do you decide between two images nearly the same? Or which one out of many from a photo shoot is the best? What attributes indicate a keeper? Many advise to only show your best photos, yet rarely give much advice on how to choose. Here are a few ideas to keep in mind when evaluating your images. Read More Tips for Choosing Your Best Images

portrait photography

Amazing Techniques to Take Stunning Portraits

Professional photographers shoot 30+ weddings a year, and in doing that, sometimes it is easy to fall into the same old technique when it comes to portraits. Even with new poses, taking portraits can become very mundane if the same compositions and angles are used for every couple–we’ve definitely been through that creative rut where our pictures start looking very familiar. Throughout the years, we’ve challenged ourselves to stay on top of our game with a few useful techniques. Here are some of our best tips to help keep things fresh and unique for each couple.

1. Using a longer lens.

A lot of photographers say that their 50mm is a “must-have” portrait lens, but what a mid-range lens offers is a very familiar perspective, something that our eyes are used to seeing all the time. To create a more interesting image, we avoid shooting portraits in mid-range because the images look too ordinary. Most of our portraits are shot at 200mm or 85mm to create beautiful image compression that a 50mm would not be able to produce. The compression will not only flatter your subjects with less feature distortion but shooting at a longer focal length will also create more dramatic background blur and brings the background closer to your subject. It may be more difficult to communicate with your subjects while shooting at 200mm, but the difference will be apparent and well worth it. Our solution to this problem was to have one of us interact with our couples at close range while the other shoots from a distance.

2. Find angles that are not eye level.

Many times we are stuck seeing what is right in front of us. It is, after all, the easiest answer to everything. Challenge yourself to find a different angle from above or below eye-level to bring a new perspective to the image. This technique can also be used to flatter subjects of different body types and heights. In the image below, we asked the bride to sit on the ground in order to focus on her face and hair ornament while blurring out the rest of her body. It makes a more interesting image than the typical straight-on bridal portrait.

3. Use off-camera flash

During a wedding, our speed lites are never on-camera, even during the reception. Flash rarely flatters a person’s face when it is straight on, and the image loses its dimensionality. Using flash to light our subjects from the side, we are able to create both light and shadow on our subjects, flattering their features and bringing a greater range of highlights and shadows to the image. It also helps us bring out details in the background to create a more dramatic landscape.

4. Overpower the sun with flash

Shooting at mid-day is no easy task when using natural light. But with some artificial lights, something as simple as a couple of speedlites can diminish the power of the sun and darken the image for better exposure. We use this technique especially when we are trying to create environmental portraits that focus on the landscape. Using our speedlites, we are able to overpower the sun and underexpose the sky while only lighting up the subject. To create this amount of artificial light, we have to use 2-4 off-camera speedlites (with no diffuser) in order to generate enough light to overpower the sun. Holding the speedlites closer to the subject (to the side) also helps put more light on the subject and allows us to underexpose the background even more for dramatic effect.

5. Find back-light

It takes time and practice to train your eye to find great light. Once you learn how to “find the light” in any situation, it will help you master taking some amazing portraits. Lighting is, after all, the essence of photographic images. Whether you are using the sun, a window, or an ordinary light bulb, these light sources can be used to create beautiful edge light (a.k.a. hair light, rim light) when the light source is place behind your subject. The effect that rim light creates can enhance the dimension of your image by separating your subject from the background, outlining and focusing on your subject.

6. Shoot through objects

When objects are in our way, we like to use them to our advantage. In fact, many times we are purposely trying to find elements to place in the foreground of our image. Learning to find holes between tree branches, abstract objects, or even ordinary household items are simple, everyday things that will help enhance your images by bringing an interesting, and sometimes colorful, element to your composition. Using a longer lens will help blur out the foreground objects to frame the subjects in a more intimate way.

7. Use video light for night portraits

Video lights are very useful when no light source is available to light up your subject in dark situations. The great thing about video lights is that they are a constant light source so you can see what the image will look like in camera. We use LED video lights, which give us enough power to last 2+ hours. They are a great alternative to speedlites for low light situations and are quicker to adjust for dark situations.

8. Use gels on your speedlites

Adding CTO (orange) or CTB (blue) gels to your speedlites will change the mood of your image. Sometimes shooting in an environment which is overcast and very blue, adding a CTB gel will warm up the whole environment if you adjust the white balance correctly. CTO gels can also be used to emulate sunlight.

For guidance of camera equipment for portrait photography, please contact us.