DJI OM 5

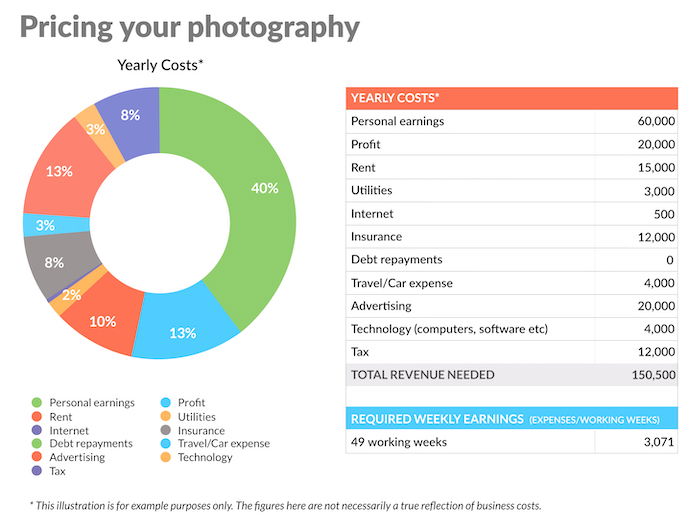
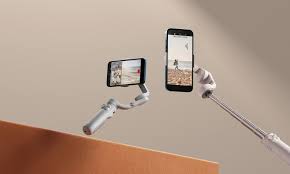
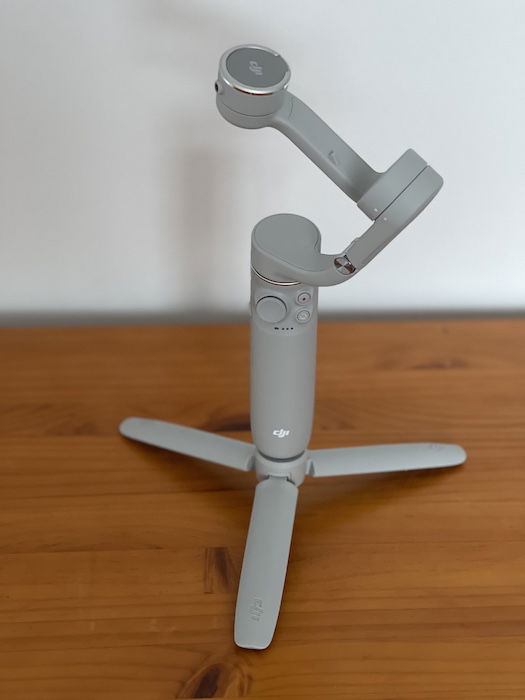
DJI OM 5 Review (Best Compact Phone Gimbal in 2022?)

The DJI OM 5 is an updated version of the OM 4 and has the same value. The OM 4 will remain on sale wherever it is available, but DJI stands. The changes include a built-in extension rod like the Zhiyun Smooth X and a smaller and simpler design due to the smaller battery. It also has better image stabilization and slower movement – at least for the iPhone.

a hand holding the DJI Om 5 smartphone gimbal shooting a woman on a bike

Key Features – How does the DJI OM 5 work?

The DJI OM 5 offers many useful features. Let’s look at the main ones.

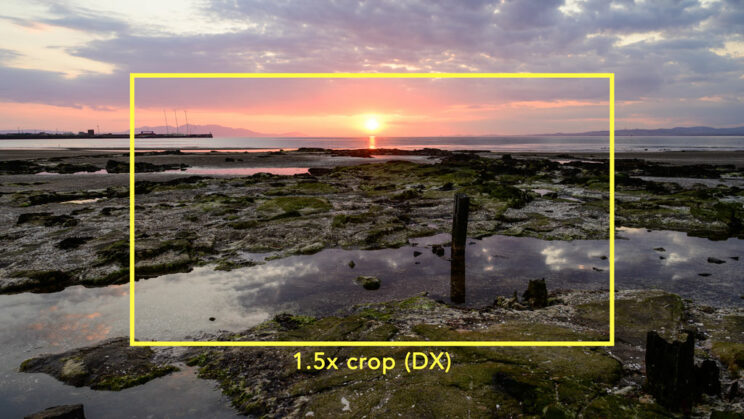
Three-axis reinforcement and Roll Range

The most important condition for testing gimbals is that they provide reinforcement of three or two axes. The OM 5 has three different modes of spinning, twisting, and tilting, which is great.

Another difference is the width of the scroll. The OM 4 can roll from 127.05 ° to 208.95 °, while the OM 5 can roll from 136.7 ° to 198 °. The scope is the same in both cases. But OM 4 can roll over while OM 5 can roll over.
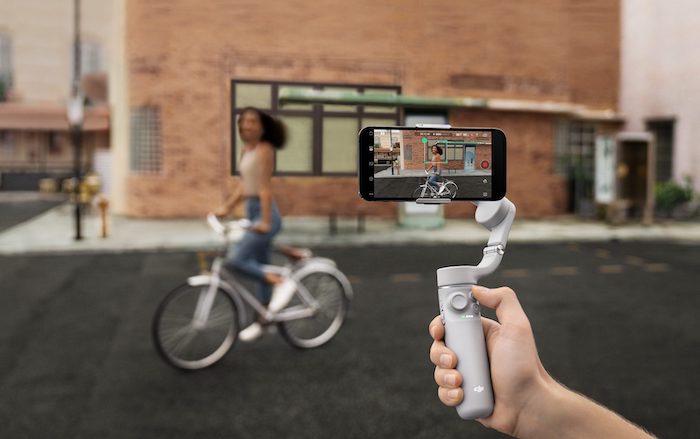
DJI OM 5 gimbal sitting on a table with a tripod

ActiveTrack 4.0

ActiveTrack is a way to embed your topic or yourself in an outline. Version 4.0 is very smooth and supports zoom up to 3x at speeds of up to 5 meters per second. All you have to do is draw a square on the head and shoulders of your subject. The gimbal will automatically follow the theme as pan, moving, and folding, keeping them in the center of the frame. The performance track works especially well with an extended rod mounted on a tripod.

DJI Mimo Software and application

DJI OM 5 has the latest software. That means the video is moving slower than the OM 4.

Every smartphone gimbal comes with a compatible app that lets you control the camera and edit your video. The OM 5 version is called the DJI Mimo. Works with Bluetooth connectivity. Once you have opened the gimbal and signed in to the app, it connects automatically. Stabilization works without the app, but not buttons, slides, or specific video features.

Shooting Methods

There are many pre-programmed features available with the DJI Mimo app. Although, some are more accurate than others!

Picture

• Picture mode allows normal, still camera capture. Holding down a button activates the explosion mode. But you do not find Night Mode & Photos available on iPhone.
• Pano is a way to use preset settings to create 240 ° panoramas. But the iPhone app does this better. And you end up with a distorted image if you try it with the Samsung Galaxy S20 Ultra.
• Pano CloneMe is a way to appear more than once in an image. You get five seconds after each shot to change location.

Video

• Video is a standard video recording.
• Slow Motion video recording reduced by 4x or 8x.
• Spin Shot is a 270 ° rotation of the smartphone while capturing video.
• Timelapse is a fast video. There are four ways to record timelapse – corrected, traced, right-to-left, or postponed. There are also custom moves to select up to four gimbal locations.
• Motionlapse is a timelapse sequence that adds gimbal movement points.
• Hyperlapse timelapse sequence shot while moving the gimbal.
• Moonlapse automatic gimbal movements to track the moon at night.
• DynamicZoom mimics the doll-painting effect used in movies such as Vertigo and Jaws. You are talking about your topic while you are filming – or vice versa.
• Touch Control is a way to take pictures of yourself. You raise your hand to the camera or make a V-shape with your fingers for two seconds to start tracking the subject. You can also start video recording by sliding your fingers down.
• Story mode with various templates using pre-set motion, music, and colors. News mode organizes itself and creates shared social media clips.

Buttons and slides

Once you’ve paired your smartphone with a gimbal and attached it using the Magnetic Phone Clamp, you can control it with buttons and slides:

• Front “thumb” to rotate and tilt, with recording and rotation buttons. When you press the rotate button once, it switches between the front and rear cameras. Double-click changes it from landscape to standalone mode.
• Side – includes digital zoom slide (up to 8x), power button to switch between photo and video, and USB-C port.
• Back – the first button resets the gimbal area.
Limitations
Many controls work as they should. But there are a few limitations to keep in mind – especially for Android users:
• The joystick and zoom switch do not provide “haptic” power. They will not respond to increased pressure. To change the adjustment speed, you must change the settings in the DJI OM 5 app.
• If you have a Samsung Galaxy S21 Ultra, the native phone camera app has a better zoom range. But that means you can’t use the controls on the gimbal.
• Sixth stick is not good for Android phones. And you can not switch between all the different shooting methods.

Alternatives to DJI OM 5

There are many other DJI OM 5 models on the market. But these are your best options:

• Hohem Steady Mobile Plus – offers realistic battery charging and special charging (up to 600 °). It has a simple button design, precise operation, and excellent face recognition and tracking. But it suffers from low build quality, jittery and laggy zoom, as well as poor operating system.
• Zhiyun Smooth 5 – Stable, rich in features, and capable of handling large phones. On the other hand, it is more expensive, harder to use, and less portable than OM 5. It has a crash app with no videos, tutorials, or proper English translation.
• Zhiyun Smooth-Q3 – with easy-to-use reusable filling lamp with impressive tracking techniques and Panoramic methods. But it has a soft, plastic feel, does not offer distorted charging, and comes with the same problematic system as Smooth 5.
• Joby Smart Stabilizer – has a built-in photo frame like OM 5.

DJI OM 5 smartphone gimbal and accessories flatlay

Verdict

The DJI OM 5 is a light, elegant, and affordable three-axis smartphone gimbal with a built-in selfie stick and available fill light clamp. It currently offers a better feature set to owners of iPhones than Android phones. But DJI might fix that in future software updates (fingers crossed).

It takes some practice to get used to the design quirks and familiarize yourself with all the offered features. But it has excellent tracking capabilities and eliminates typical smartphone camera shake. There are plenty of shooting modes, including Pano, Timelapse, and DynamicZoom. And the ShotGuides (video tutorials) are also a good source of creative inspiration.

Best nikon camera 2022

The Best Nikon Cameras You Can Buy In 2022

I know what it’s like to try to decide on the best Nikon camera. As a wildlife photographer, I have been through a few cameras.
I started with the Sony HX200V bridge camera because I was looking for a superzoom for my first trip. But then I saw pictures of someone who had a DSLR. ‘I was jealous of the camera’, so I spotted a Nikon D800 with a 28-300mm lens. Eventually, I upgraded to the D810 and D850.

What is there now? To help you determine the best Nikon camera for you, I have listed the best features of the Nikon camera, as well as its strengths and weaknesses. That way, you can see which ones fit your needs.

Best Nikon DSLR

Maybe you already own a Nikon DSLR and don’t want all the expense and difficulty of trading with your F-mount lenses to get the same size without glasses. Here are some of the more powerful Nikon cameras available.

Nikon D780

• Fuller frame (FX) sensor.
• 24.5MP
• Dual SD card spaces
• ISO 100 – 51,200
• 7 frames per second (12fps in Live View mode)
• 51 focus points
• 4K Ultra HD video

The Nikon D780 is a full-featured camera aimed at professional photographers. It is a multi-functional gadget, and you can use it in many forms.

Improved version of Nikon D750. It comes with a large sensor and an expanding ISO of 204,800. Adjustment and variable width results in excellent image quality.

A picture of a D780 Nikon camera body

Nikon D6

• Fuller frame (FX) sensor.
• 20.8MP
• Two XQD / CFexpress card spaces
• ISO 100 – 102,400
• 14 frames per second, 3D-tracking
• 4K Ultra HD video

The Nikon D6 has the fastest frame rate for DSLR. That and its slim, weatherproof body make it a last, rugged, reliable, and professional camera.

Its frame rate comes in terms of sensor size, and is the second heaviest camera in this comparison after the Z 9. But it offers excellent reliability.

A picture of a Nikon D6 Nikon camera

Nikon D3500

• Crop / APS-C (DX) sensor.
• 24.2MP
• SD card slot
• ISO 100 – 25,600
• 5 frames per second
• 11 focus points
• HD video

The Nikon D3500 is for those who have just entered the photos. It also has a guide mode to help you hone your photography skills.
11 points of autofocus are less than you can find in other DSLRs. But the focus system is precise, and it is ideal for many amateur photographers.

5fps continuous shooting speed is not bad for motion capture. It can also record 60p HD video.

A picture of a D3500 Nikon camera body

Nikon D5600

• Crop / APS-C (DX) sensor.
• 24.2MP
• SD card slot
• ISO 100 – 25,600
• 5 frames per second
• 39 focus points, predictable tracking
• HD video

The Nikon D5600 is a good entry-level DSLR camera. Its 24.2MP crop sensor and ISO range leave no reason to worry about image quality in insufficient lighting.

This gadget comes with a 39-point autofocus system. They are not as impressive as high-end DSLRs, but they are still a reliable choice for still and moving lessons.

A picture of a D5600 Nikon camera body

Nikon D7500

• Crop / APS-C (DX) sensor.
• 20.9MP
• SD card spaces
• ISO 100 – 51,200
• 8 frames per second
• 51 focus points
• 4K Ultra HD video

The Nikon D7500 could be the leading DSLR for those planning to upgrade their photography to a professional level. It is a cross between two other Nikon cameras — offering many of the same features as the D500, but in the easily accessible and compact body of the D7200.
Its ISO range can be extended to ISO 1,640,000. It also has a 51-point AF program that includes a local AF team for securely tracking the topic.

A picture of a D7500 Nikon camera body

Conclusion

So which Nikon camera is best? Which Nikon camera should you buy?

My mind will go with the current trend towards full-screen independent cameras buy the Nikon Z 9 — unless you have no budget or prefer to just take vacation photos!

If you can’t afford the Z9 or can’t afford to part with all your DSLR lenses, I recommend the D850. That was the DSLR I had before the mirrorless switch, and it is a very good rounder. Although you may want to wait for the release of the new Nikon camera — the D880—!
Lastly, if you have a budget or want something that will take a picture of a rhino miles away, then the Coolpix P1000 may be yours. It has a crazy 125x optical zoom! … I hope this article helps you choose the best Nikon camera for you.

product photography

Best Camera for Product Photography

Product photography is a profitable, exciting, and needed niche. The right tools will help you to capture those beautiful images for sale. So today, we will take you to the best cameras you can buy for product photos.

10 Best Product Image Cameras

Product photographers are the world’s leading photographers. In addition to their skills and experience, they also use expensive equipment to get the best results.

Some cameras used by product photographers can exceed 40,000USD. Now, that is beyond budget even for the most enthusiastic activist.
We have included the best options for beginners, professionals, and professionals in this list. That way, you can choose the perfect camera regardless of your level of ability or your budget.

Sony a6400

• 24MP
• APS-C sensor
• Sony e mount

The Sony a6400 may be out of the budget for beginners, but if you want a small, easy-to-use camera, look no further.

Of course, its 24 megapixels give you more than enough quality image quality. However, its actual power is limited but compatible with the Sony E lens range.

Product photo of Sony a6400 body, camera for product photography

Panasonic Lumix FZ80K

• 18MP
• 4K video
• Long-distance zoom camera and capture

The Lumix FZ80K incorporates a variety of capabilities that can contribute to the capture of excellent product images. First, it has a lens the size of 20-1200mm. So, this camera can cover everything, whether you take a wide-angle or zoom the picture.

The camera also has a Post Focus feature, so you can set the focus area after taking a picture! It comes in handy for product photography, especially for food photography. Your camera should be on a tripod, and it will be easy to install this feature in your photoshoot.

Product shot of Panasonice Lumix FZ80K, one of the best cameras for product photography

Nikon D850

• 45MP
• 153 focus points
• Snap bridge connection

The Nikon D850 is not cheap. But if you can afford it, you know it costs more than you can afford.

The main reason for being the best investment is the image quality. It has one of the lowest examples of ISO audio when it comes to all the DSLR options we have listed.

Product image of Nikon D850 camera for product photography

Sony Alpha 7R IV

• 61MP
• Fast and comprehensive autofocus (AF)• 5 axis stability

Many photographers have changed when Sony releases special cameraless mirrors for professionals. Why? Because glassless options are small, they tend to pack more features than a standard DSLR.

Product photo of Sony Alpha 7R IV mirrorless camera body for product photography

A lot has changed since Sony introduced its technology line. And Alpha 7R IV is the culmination of all those years of research and development.

What makes the Alpha 7R IV different is that it features a 61MP back-side illuminated (BSI) -CMOS sensor. That low light feature blows the Canons EOS 5DS and Nikon D850 into the water.

What camera features do you need to take product photos?

1. Manual mode

Every camera has a default mode. But professional photographers do not use it often because it can sometimes be unreliable.
Automatic cameras are not the same as the human eye. No matter how advanced they may be, they still make mistakes.
That is why photographers prefer to have complete control over all aspects of photography. And the manual mode allows them to do just that.

What if you have never tried manual mode before? It is not that difficult to read. Check out this quick guide in manual mode, and you will see.

Essential Camera Settings

When you create a product image, the default camera settings will not always be accurate. So it is still best if your device allows you to select ISO, shutter speed, and input combination.

That way, you always get the right exposure. In addition, your camera should allow you to adjust the white balance to capture precise colors.

Highly Corrected Sensors

When you get into product photography, check the megapixel number of your camera. If the megapixel number is large, the file is large and the print quality will be high.

The better adjustment you have, the better the ability to capture the details. After processing, the level of accuracy you get from high-resolution cameras allows you to adjust your editing even better.

Conclusion

Don’t think too much about the best camera for your product when you start. It should be fine if you have an old 12MP DSLR or a mirrorless camera.

Don’t invest in expensive cameras, especially if you don’t have the information yet. It is challenging to take advantage of all its features if you do not know how to use them properly.

So take your time and learn. And as you grow your income, you can buy better equipment that fits right in the middle of the road.
Remember that even the most experienced product photographer has gone through the same experience. So be patient, because you will also get there in the end.

Travel photography

How to Become a Professional Travel Photographer

Travel photography is an all-encompassing field. It incorporates all sorts of image styles and work styles within it. They are great pictures of moving scenes, attractive pictures, and fun food!

And how do you get started? Like all sorts of different images, you start with the creation! It may not make sense, but you need to get out and start taking pictures of the walk.

Travel photographer in the middle of a street taking a photo

Step 1: Decide Which Style Is Right For You

First of all, do you like to travel? How do you feel about long flights, overcrowded airports, and unpacking and repacking of your belongings? What about living in a suitcase?

Photography for tourists is not for the faint of heart. Many see it as an easy way to work, but it is not. An independent travel photographer has to deal with a lot of difficult situations. Bad weather, aggressive locals, or long journeys are common problems. Walking can absorb all your energy. And it makes it even harder when you have limited time to take the pictures you need.

Travel photographer standing in an aiport with a camera slung over their shoulder

Step 2: Study the Comprehensive Grade

Being able to use your camera is important. Learning a variety of photographic skills is essential. And understanding how to take pictures of landscapes, take pictures, or take a long-distance street scene will go a long way.

Photography is a visual and very effective art, so you have to show that you can do it by showing that you can do it.

The educational needs of travel photographers vary. Photography lessons can help you learn the basics of photography and editing skills when you start over.

Step 3: Define Your Travel Photography Niche

Being an independent photographer requires hard work. Unfortunately, the photography business is very competitive. Part of this hard work is finding a way to shine.

Your work will reflect your worldview, unique to every travel photographer. It can help to find a way to express your opinion in your travel photos. Create a signature style that excels for your competitors.

Step 4: Create a portfolio of your best travel photos

A portfolio is a series of photos you take. It can be an online portfolio or a print version, which allows customers to see the type of travel photos you are taking and how you are taking them. It is a visual guide to the image quality they can expect from you. Apart from the portfolio, you can look at, clients will probably find it challenging to offer you a job based on your word only.

Person organizing photos on a laptop computer

Step 5: Create a Tourism Website or Blog

Creating your own website or blog to showcase your work is important as a travel photographer. These tools will help you show your customers that you are a professional photographer. Also, it makes it easier for potential customers to find you and reach you. Using one of these forums will help you to organize your work and present it in your preferred format and style. You can find art and use a design that makes your content even more appealing.

Step 6: Choose Where to Go and Travel

Resources can help you get started as a travel photographer. However, I believe in the baptism with fire. If I was just starting out and had a small travel budget, I would choose a place to go and travel. That’s all. You can arrange everything once you have a place to go. You can make a documentary in India or record the process of cloth death in Morocco.

Once you have your destination, you can start researching. Learn about good photography habits, what time the sun sets, and where you live. Then, with a clear idea of ​​”where” and “what,” you can find out who might be interested in the photos you take.

Conclusion

It doesn’t matter if your goal is to work for National Geographic or to make a living from your printers and websites. Being a professional travel photographer requires a lot of work. But don’t worry! Many traveling photographers start with the basics, such as photography for beginners, and they just take it. You will get there!
We hope these tips for taking a photo tour will help you discover how to become a travel photographer and draw a career in photography!

Photography Pricing Guide: How Much Should You Charge in 2022?

“How much should photographers charge?” That is a valid question. And a good answer would be $ 100-300 per hour or $ 75-350 per photo for professional photographers in the United States. But the price of photography is much more complicated than that.
First, it depends on the type of imagery you are discussing. Also, how much knowledge do you have, what are your expenses, and how much time do you spend? Let’s look at these and other questions!

Various Income for a Successful Photo Business

First, many people take pictures with cameras and smartphones. And there are a lot of services for professional photographers out there. Therefore, it is difficult for professional photographers to make a living.

Therefore, we must allocate our revenue sources. Personally, I have tried to push a few different doors to see which ones will open:

• photoshoots
• competitions
• Photography courses
• framed prints
• Stock photography websites
• books and articles (like this one!)
• conversations and podcasts
• membership salary
• Greeting cards
• wallpaper (for iPhone, iPads, and computers)
• equipment leasing

Pricing Model for Photographers

Price may vary from place to place and between different types of images. But the first task is to measure the level of the market and what your annual operating costs will be.

After that, you can divide your expenses by the number of weeks you intend to work. Then you can decide how much money you need to earn each week to make a profit.

If you are making a few assumptions about the amount and number of jobs you get for the price you have chosen, you have the start of a business plan. Let’s look at all of that in more detail.

A freelance photographers home studio space

How It Means Market Rate

A quick Google search for photographers in your area will yield more results.

Each type also has different image values, so it pays to be specific. For example, if you live in Los Angeles and photograph families, search for “Los Angeles family photographers.” Or, if you want to get into wedding photos, check out “local wedding photographers.”

Note that it can be a challenge to find photo prices online. Many professional photographers do not display their values ​​on their websites. In most cases, they do not want to keep everything secret in other businesses.

In general, the needs of their customers vary widely. It makes sense for them to budget their services according to the specific services people need.

The good news is that many photographers share their original values. That will let you know at least where to start your price.

Pie chart of example photography costs and pricing

How to Operate Costs Are Determined

Remember that setting your prices to match your competitors is not enough. You should also consider your operating costs, consistent and flexible. This should include everything you can think of:

• Cameras, lenses, and other equipment costs
• salaries (including yours!)
• Monthly rental of your photo studio (or home office if available)
• resources
• the Internet
• registration of software editing, your website, email hosting, etc.
• travel expenses
• advertising costs
• insurance
• debt repayment

In addition to your operating expenses, determine how many hours you spend on each job. Include client time before capturing.

Conclusion

As creators, we often find it challenging to call our talents. But as photo business owners, our values ​​should support our business and our health.

So, do your research. Find out if your image values ​​match the entire category. And don’t be satisfied with your prices. Always grow as your dignity grows. That way, you can develop a thriving photography business as an independent photographer.

It is also important to find a price model that is easy to understand. That means your clients need to know what to pay and what they get. Are you paying by the hour, day, or project? It helps to put things in perspective so that people will trust you — and avoid conflicts with angry customers!

Setting a price for photos may be intimidating. But as you gain experience, you begin to understand how it all works. So be patient. Everything will come easily as you learn more about your business and how many photographers.

Camera flash

Best Canon Camera Flashes to Buy in 2022

Today, we take a special look at your camera shots in Canon. I will guide you through the entry level options at the top end of the Canon flashgun list. Looking at the key features of each flashgun, I will highlight the light of the best Canon camera you can buy!
As you develop your styles and techniques, you will need a gun in your kit bag. Flashguns are an integral part of the kit when working with light subjects.

What is Camera Flash?

Outdoor lighting — often called a flash unit or flashgun — is an attachment that provides light and works in harmony with your camera. You can connect the flash with a hot camera shoe or cable. They can also connect wirelessly with infrared or radio waves.
Light photography allows you to capture scenes in low-light conditions. If you have a built-in flash, you can see that it emits a flat light and does not allow for complete control. The outdoor light changes this.

All outdoor lighting allows you to rotate and tilt your head to allow your light to appear in different places. You can also adjust the power and width of the flash zoom in each image you take.

Canon flashgun 270EX II for SLR Cameras

Canon Speedlight EL-100 (Entry Level)

• Size: 65x92x71mm
• Weight: 190g
• GN (m): 26
• Check / Swivel: 0-90 ° / 150-180 °
• Boom Width: 28 or 50mm (manual)

The Canon EL-100 is a small packing gun. It is amazing how modern technology can produce the same power as the big guns from the back of the day.

an image of a Canon EL-100 camera flash

Canon Macro Ring Lite MR-14EX II

• Size: 130x112x25mm
• Weight: 455g
• GN (m): 14
• Tilt / Swivel: None
• Scope Boom: None

This is a light Canon ring that you can use to take great pictures. Crystal lights are very fun and give a bright glow that can be in great shots. The light of the ring sticks to the front of your lens, giving it a 360 ° light near the lens.

Canon ring light on a Canon DSLR camera

Canon Macro Twin Lite MT-26EX-RT

• Size: 69x112x90
• Weight: 570g
• GN (m): 26
• Tilt / Swivel: None
• Scope Boom: None

The Canon Macro Twin Lite is a good example of how special equipment develops in photography. This set provides the perfect rig for your large lens that is fully adjustable. So whether you want to use one light on one side or two lights working from either side, this has it covered.

Canon Speedlite 430EX III-RT (Best Price)

• Size: 71x114x98mm
• Weight: 295g
• GN (m): 43
• Check / Swivel: 0-90 ° / 150-180 °
• Zoom distance: 24-105mm

Canon 430EX is a flash to Canon to get your money back. It has a wide range of advanced functions and the necessary zoom range. This makes it a great option if you are a well-trained photographer who wants to get an external flash for the first time.

Canon Speedlite 470EX-AI (Advanced Technology)

• Size: 75x130x105mm
• Weight: 385g
• GN (m): 47
• Check / Swivel: 0-120 ° / 180-180 °
• Zoom distance: 24-105mm

The Canon 470EX introduces artificial intelligence to Canon’s range of firearms. Canonans are very excited about this new technology as they say it is the first flash with AI-bounce technology.

Canon Speedlite 600EX II-RT (High Range)

• Size: 79x143x123mm
• Weight: 435g
• GN (m): 60
• Switch / Swivel: -7-90 ° / 180-180 °
• Zoom distance: 20-200mm

The Canon Speedlite 600EX is Canon’s most advanced camera flashgun. This flash will work with the flash on or off the camera, giving you complete control and reliability even in the most difficult situations. Allows you to shoot from a distance of up to 30 meters!

Canon Speedlite EL-1

• Size: 84x149x136mm
• Weight: 687g
• GN (m): 60
• Check / Swivel: -7-120 ° / 180-180 °
• Zoom distance: 24-200mm

Canon Speedlite EL-1 is for professional photographers who do not want to sacrifice quality when shooting time-sensitive lessons. You can tell Canon that he is thinking a lot about his new creation as it is the first unit to wear the red ring that is usually found in their top series of lenses.

Conclusion

After looking at our list, you can see the light of the best Canon camera at certain levels of photographers. You will also notice that the features vary from light control to battery life. Make sure you think about where you will use your flash, as this will help you determine which one is best for you.

Camera prices in Pakistan

Camera prices in Pakistan fluctuate frequently due to the change in the dollar rate, prices fluctuating. Golden Camera has made things easier for its customers by not changing prices and keeping prices accessible to the people of Pakistan. The DSLR camera is for you if you are a person who enjoys high-quality photography and video recording. These multi-functional cameras give you a good idea of ​​what the final image will look like.

Whether you are a professional or a beginner, these devices can be tried because they come with flexible hand-held controls, flexible lenses, and amazing image quality. Not long ago these cameras were used only by professionals, but nowadays anyone with a love of photography can afford them. Sometimes it can be difficult to find the right equipment at the right price, which is why we have made a list.

Check out Our Best Camera Prices in Pakistan

1. Camel Canon EOS 5D Mark IV DSLR

It is at the top of our list because it is a powerful machine with outstanding photography options. This amazing camera is capable of shooting in 4k and offers a fully compact CMOS sensor of 30.4MP as well as excellent balance and sensitivity adjustment and low light performance. It is capable of operating within the extended ISO 100-32000 range and reaches ISO 5-102400 with low noise and sharp images in various conditions. As well as quality features and high performance, users also get to upgrade the AF system, GPS and much more.

To deliver fast and detailed images, the Canon EOS 5D Mark IV DSLR camera uses a DIGIC 6+ image processor. It can also handle up to 7 frames per second when shooting continuously. There is a measuring sensor of 150,000 pixels that scans the scenes and gives you the right exposure under different lighting settings. The camera price of the Canon EOS 5D Mark IV DSLR in Pakistan is 325,000 Rupees. You can buy this camera by visiting here.

Canon camera

2. Nikon D850

This camera gives you high resolution and speed when taking pictures. There is also a recording of the expiration date and a suitable movie that gives you flexibility. The camera has a 45.7MP BSI CMOS sensor, EXPEED 5 image processor, and high resolution that gives you detailed images. It can be very helpful to you if there is low light around, the sensors also provide a sharp edge.

The Nikon D850 comes with the latest timepieces and recording techniques ready for recording. There is an advanced AF system, the flagship D5, and 99 contrast sensors that give you good focus when taking pictures with various light settings. The price of the Nikon D850 in Pakistan is 319,000 Rupees. You can buy it in our store by visiting here.

Nikon camera

3. Camel Canon EOS 5D Mark III DSLR

This is the third on our list because of its 22.3MP and unique graphics capabilities. Comes with the latest DIGIC 5+ processor that gives you detailed images even in low light areas. It can be expanded to the ISO 102400 range. Image quality can also be enhanced by the latest 61 points with high-density autofocus, which includes 41 AF-type points and extreme sharpness.

The Canon 5D Mark III has an AF system and uses color information to give you accurate exposure. Multiple exposure modes and HDR have great potential that can reduce the production stress posted in your head. It can also record HD videos at multiple frames.

It has high brightness and light resistance which can be useful in light conditions. There is a Superimposed LCD that shows 100% viewing. The price for Canon EOS 5D Mark III DSLR Camera in Pakistan is 293,500. Available at our store to buy it Here.

dslr camera

4. Camel Canon EOS 6D Mark II DSLR

The Canon EOS 6D is a next-generation camera for professional photography. A gold camera has been made available to the people of Pakistan. It has a high-performance model, and many advantages compared to older models. You will get enhanced imaging with the help of a 26.2MP CMOS sensor. It uses the DIGIC 7 image processor to be sharp and has a clear image in many different situations. It gives you an advanced ISO range of 100-40000. It can be reused up to ISO 5-102400.

You can expand your photography career with an outstanding AF program. There are many improvements made to it compared to older models leading to faster acquisitions. With the Advanced AF system, its sensors incorporate dual Pixel AF technology for advanced focus during video capture. This is an outstanding model for both beginners and professionals. The price for the Canon EOS 6D Mark II DSLR Camera in Pakistan is 269,000. You can just visit our store Here. and buy it at a discount.

digital camera

5. Nikon D750

Are you a person who likes to be strong on your camera? Then this camera is for you. It has a completely new way of taking pictures that enhances performance. Internal circuits are developed in a way that gives you high resolution. The interface of this camera is designed to give you control and help you focus on the photos you are about to take.

nikon camera

There is no need to look at the specs because you can only understand the true power of this amazing camera if you hold it in your hands. The manufacturers have really pushed the design to a whole new level by combining practical features. Pakistani Nikon D750 Camera Rs 215,000 rupees. You can order this easily by using Here.

dji-mavic-3

DJI Mavic 3

The DJI Mavic 3 is the most powerful wrap-up aircraft ever made by the company – and in terms of pure performance, and advanced. But the major improvements to the DJI Mavic 2 Pro come at a cost. This means that for many non-professionals, the small and affordable DJI Air 2S is the best buy for everything.

The highlight of the DJI Mavic 3 is undoubtedly its new dual camera, which combines dual sensors and lenses. Surprisingly, the main camera has a 20MP Third CMOS sensor with adjustable position – and this gives the best picture quality in its class. The second drone phone lens is very limited, it does not have hand-held controls or uncooked shots, but it is an occasional useful way to capture remote subjects.

The Mavic 3 is available in two versions – Standard and Cine. The main difference between the two, the price aside, is that Cine features a built-in 1TB SSD built-in 8GB of internal storage, with video support for Apple ProRes 422 HQ. We used Cine Premium Combo in this review, which offers all the features of the same aircraft and photography features as a standard version, with the exception of Apple ProRes shooting capabilities.

Release date of DJI Mavic 3 and price

The DJI Mavic 3 is available for order today and in one of three kits. As always, there is the standard version, as well as the Fly More Combo which offers a variety of useful features (including two additional batteries) at a lower cost than buying everything separately.

The Mavic 3 Standard version costs US $ 2,199 / £ 1,879 / AU $ 3,099.

The DJI Mavic 3 drone's front camera

Designer and controller

The Mavic 3 follows the same design principles as the previous Mavic drones. In addition to its dark paint job, the Mavic 3 also has that distinctive Mavic look, which is a celebrity architecture and build quality.

The folded size of the Mavic 3 is 212 × 96.3×90.3mm, and its open size is 347.5 × 283×107.7 mm. This makes it look like the Mavic 2 Pro when folded, and the open size becomes slightly larger.

Although the battery is a major player in the developed Mavic 3 aircraft, other engines and propellers (along with a slightly reduced drone weight) help increase flight times)

But those are not the only developments in the design, with a drone, camera, and propeller arms all intended to reduce drag, DJI claims to add 35% improvement compared to the Mavic series 2. This, of course, is impossible to test, but flight times have improved from the previous generation.


Features and flight

The Mavic 3 is a nimble drone that is more responsive to aircraft than ever before the Mavic 2. In this case, it is actually similar to the DJI Phantom 4 Pro V2.0. The controls are very sensitive to both Normal and Sport modes, while Cine Mode offers reduced control sensitivity and smooth flight speeds as well as additional video recording.

The plane is as soft or low as you need it. While the features and price of the Mavic 3 make it more suitable for experienced pilots and professional content creators, it can also be a starting point for beginners due to its advanced security features and popular Quickshots flight modes.

The DJI Mavic 3 drone's battery

Although the Mavic 3 has perfect power in terms of features and image quality, DJI is well known for producing safe drones and is easy to fly and this drone, despite the high price tag, can produce a great first drone option. pilots. This is definitely an airplane you can grow as your skills and aviation needs improve, and investing in a high-end model can ultimately save you money over time as it can reduce the need for improvement over time. Although for many, the DJI Mini 2 and Air 2S model offers some compelling options.

Video and image quality

The Mavic 3 crown jewel is its Hasselblad dual camera, with a large camera with 20MP Four Thirds CMOS sensor and an equal focal length of 24mm.

This camera, like the Mavic 2 Pro, offers a flexible range of f / 2.8 to f / 11 with automatic focus and manual focus from 1m to infinity.
The quality of the image from the main camera and video camera is not lacking in all the best, with a slight sharpness that falls on the edges of the frame when viewing still. But the fall rate is low, and you have to look out for it. And much better than the visual fall from DJI Air 2S ‘photos.

An aerial photo of a river taken on the DJI Mavic 3 drone

Even without combos, the Mavic 3 is one of the most expensive drones. However, with a high-quality Hasselblad camera with all the smart features upgraded, it is more than just cost. Check out the Mavic 3 today and enjoy dual cameras with double the power!

Nikon Z6 II vs Canon R6

Nikon Z6 II vs Canon R6

The Nikon Z6 II and Canon Eos R6 are two full frame mirrorless cameras that pack a lot of features. They certainly share a few similarities, including in-body image stabilisation, hybrid autofocus and 4K 60p video, but once we analyse the specifications a bit closer, there are small yet important differences we need to highlight.

1. Image sensor

The Nikon Z6 II features a 24.5MP sensor, whereas the R6 has about 20% less resolution at 20.1MP. Both cameras have a low pass filter, whereas only the Nikon sensor has a BSI design (back-illuminated). The latter, on paper, provides better light gathering which can improve the quality when it comes to dynamic range and high ISO.

Close-up on the Canon R6 sensor

2. Image stabilisation

Both cameras have image stabilisation, with a 5-axis mechanism that moves the sensor to compensate for camera shakes. It works in photo and video mode.

The Z6 II has a rating of 5 stops (CIPA), which is the average you find on many mirrorless cameras including the Sony A7 series. It is the same mechanism found on the original Z6, and allows you to take images hand-held around 1s if you have the patience to find a comfortable position and take multiple shots to make sure one is perfectly sharp.

Both systems work in conjunction with optical stabilisation when a compatible stabilised lens is attached. The R6 uses three axes on the sensor (roll, x and y) and the remaining two axes on the lens (pitch and yaw). The Z6 II uses 1 axis on the sensor (roll) and two on the lens.

The IBIS mechanism on the Nikon camera


3. Autofocus system and burst speed

Both cameras feature on-sensor phase detection AF points. The Z6 has 273 points that cover 90% of the sensor area.

Concerning the sensitivity in low light, the Z6 II has an advantage if you activate the Low Light AF mode, which is slower but can focus in darker conditions.

  • Z6 II: -4.5Ev at F2 (or -6Ev with Low Light AF)
  • R6: -6.5Ev with a F1.2 lens (or -5 at f/2)

Screenshot of the Canon R6 live view, showing animal subject detection AF at work on a red kite flying under the blue sky

4. Video

Both cameras can record 4K video up to 60p, whereas in Full HD they can go up to 120p.

The Z6 II uses the entire width of the sensor and over-samples from a 6K region up to 30p. At 50 and 60p however, a 1.5x crop is applied to the sensor.

Concerning audio, both cameras offer a 3.5mm microphone input and headphone output.

The R6 delivers excellent video quality with fast and reliable autofocus and a good range of formats to choose from. The only limit is overheating, which is not as dramatic as it was once believed (also thanks to firmware updates) but it can definitely slow down your production day.

sunset on the beach, with a bright yellow rectangle showing the DX area

5. Design

The Canon model is slightly bigger and has a larger front grip, whereas the Nikon is a bit taller. The two remain very similar overall when it comes to dimensions and weight. They are dust and moisture resistant, and feature a magnesium alloy frame.

  • Z6 II : 134 x 100.5 x 69.5mm, 705g
  • R6: 138 x 97.5 x 88.4mm, 680g

Conclusion

The Nikon Z6 II and Canon R6 are two very competitive full-frame cameras on the market today, and I admit that if I were to choose between the two, I would not be able to make a decision quickly. If we dig deeper, we find a number of differences that could lead you towards one or the other.

The image quality is very similar, with the Nikon packing a few more megapixels. They have excellent autofocus performance, with perhaps the R6 having a small advantage thanks to features such as animal subject detection that is more complete in terms of the number of animals the camera can recognize. The Canon also has the advantage of a faster burst speed when using the electronic shutter.

If you don’t mind using an external recorder, then the Nikon is the only one with 12-bit RAW video options, as long as you’re fine with sending the camera to Nikon’s Repair Service for a fee.

The two are different in their own way when it comes to design and ergonomics, but they both offer solutions that I really like in terms of the button layout. Another advantage of Canon is that it uses the same type of card for both slots.


camera price in pakistan

Best Camera Under $1000

Best Camera Under $1000!

The best camera under $1000 will offer many useful features, excellent performance, and amazing capture.

So which is the best camera under $1000?

Prices are always changing as we all know, so our list of candidates will change over time, but at the moment we think these cameras give you a lot of money.

If you are looking for the best camera under $1000 come to the right place. Whether you want a standard DSLR, a compact lens, or a modern mirrorless, we’ve compiled a list of cameras that cover all the bases. You no longer have to break the bank to have a camera that brings outstanding image quality and many advanced features.

If you think you want to spend a little over $ 1000, you can also check out our guides for the best mirrors or the best DSLR cameras. Don’t think that you have to spend a lot of money to get a good camera – even some of the cheapest cameras on this list can produce stunning images.

Some of the cameras below are slightly more advanced than others, you will need to consider what style of photography you want to focus on so that you can determine which features are most important. If you want to take pictures of wildlife, it may be a good idea to rely on the Micro Four Thirds dynamic cameras but if you want to take video and still images, look for a powerful 4K camera.

Point and shoot: Sony a6100

In addition to taking good pictures, the Sony a6100 has one of the simplest and most powerful autofocus systems we’ve tested, especially in this camera class. Choosing your theme is easy, and the camera’s ability to track moving people is amazing.

The a6100 has a selfie-friendly touch screen and a medium-quality electronic receiver. Burst shooting comes out at 11 fps with continuous autofocus.

Whereas the a6100 is lacking in terms of usability and video. It is not the most attractive camera to use, with cluttered controls and confusing menus, but the default mode and simple, powerful autofocus mean point and shooting. On the video side, though there is a lot of detail, there is a lot of shutters and a big crop when shooting 4K / 30p video (which is not a problem at 24p). That being said, the AF camera system can work as well on video as it does on stills.

Additional controls: Fujifilm X-S10

The X-S10 puts more control in your hands than the a6100, with pre-dial and post-control control and a play stick to stop autofocus point. A hands-on photo experience similar to the classic SLR style camera, but also a fully customizable screen to allow for high-quality shooting and video.

Another great benefit is Fujifilm which provides physical stability, making it easy to get sharp images and strong video in most cases. It can shoot up to 20 frames per second but can’t match Sony to get autofocus power and simplicity: AF is usually good but track tracking is unreliable, so you’ll need to work hard to keep AF with your title.

The video is beautiful, with 4K with 30p detail details without clutter and a well-controlled rolling lid. There are also headphones and mic sockets for sound enhancement, too. But Fujifilm’s most compelling feature is its Film Simulation color range, which offers a wide range of attractive ‘look’ features for your photos and video, without the need for filters and further processing.

Notable Mentions


Canon EOS M50 Mark II: The Canon EOS M50 Mark II is an APS-C integrated mirrorless camera with an intuitive menu system and a fully defined touch screen. However, they are not as well built as the Nikon Z 50 and have very limited 4k recording capabilities.

Canon EOS RP: Canon EOS RP is a mirrorless camera with a full frame that delivers excellent image quality and has an effective autofocus focus system. However, its price exceeds $ 1,000 when purchased a new one with its 24-105mm STM kit lens.

• Canon PowerShot G7 X Mark III: Canon PowerShot G7 X Mark III is slightly cheaper than the Canon PowerShot G5 X Mark II, but has no EVF and has a slightly shorter focal length.

• Fujifilm X-T200: The Fujifilm X-T200 is an easy-to-use APS-C glassless camera that brings the highest picture quality to the Sony α6400. It has a slower autofocus system, is uncomfortable to use, and sounds like it’s very cheap.

• Fujifilm X-E4: The Fujifilm X-E4 is a compact rangefinder integrated APS-C sensor rangefinder. It offers excellent image quality, excellent video quality, and can shoot at 4k up to 30 fps without crop. Its lack of handgrip and non-rubber body makes it uncomfortable to hold for long.

Nikon D3500: The Nikon D3500 is a good choice if you want a cheaper DSLR relatively easy for beginners, thanks to its built-in ‘Guide’ shooting mode. That being said, it has a fixed screen, a simple autofocus system, and has no improved video features.

Nikon D5600: The Nikon D5600 is a better alternative to the Canon EOS Rebel T8i, but it can be difficult to find and does not support 4k video.

• Sony α6100: The Sony α6100 is very similar to the Sony α6400, though it has a low-resolution viewer and does not support Log profile capture.