All You Wanted to Know About Tripods
Stability helps us sleep at night, and makes life easier. Considering how important stability is to our everyday lives, it amazes me how often people overlook it when it comes to their photography, opting to go with inexpensive tripodsa if they even use a tripod at all.
A good tripod makes all the difference to photography. We get calls at the gallery, e-mails, and people ask us more questions in regards to tripods than any other piece of equipment. To better understand the importance of the tripod to photography, we’ll look at a few of the reasons landscape photographers don’t leave home without one. Then we’ll go over what to look for when buying your own tripod.
Stability
 First and foremost, tripods provide stability. Believe it or not, you can’t hold a camera dead still when trying to photograph a scene. At the very least, there will be some vibration introduced to the camera in the process of taking your photo.
- With a normal mid-sized lens, say 50mm, the typical saying is that it becomes VERY difficult to handhold a shot at anything below 1/60 of a second.
- If you’re photographing wildlife with a larger lens (say 100-400), the rule of thumb is that your shutter speed should be double your focal length in order to minimize vibrations.
- If you’re shooting at 200mm, you will need 1/400 of a second to hopefully capture a nice sharp image.
In low or limited light, stability becomes more and more difficult. Seasoned pros can usually handhold about 2 stops lower than normal and achieve decent results…but this usually requires contorting into an abnormal position, locking elbows, using a knee as a resting point, or some other kind of bodily interpretation of a tripod.
Creativity
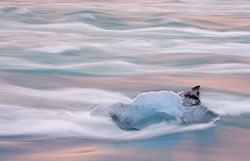
Did you ever see one of those silky waterfall images in a magazine and wonder, “How the heck did they do THAT?!” Actually, it’s easy. The main ingredient is not technical skill. There is a bit of that, sure, but the main component of getting those types of images is a tripod. Once you place your camera on a tripod, the choices of how you want your images to look is up to you. You’re no longer bound by the limits of your shutter. If you want to capture an image of the sea over hours, you just need to pick the right time of day, set up your camera, trip the shutter, and wait. If there isn’t a strong breeze blowing or a pesky 5 year old shaking your tripod, you’re good to go.
The advantages of a tripod don’t end with moving water. Many of the images you see these days have been captured ON a tripod.
- Star trails — tripod
- Nighttime city skylines — tripod
- Architecture interiors — tripod
- Portrait work — tripod
- Product photography — tripod
Quality
 Every time you open your shutter, there is vibration introduced to the camera. The best way to minimize this is to use a tripod. The tripod allows you to set up the shot the way you want it, and then leave it in place so you know that when you trip the shutter the image will be like you framed it.
Hand-holding an image, I’ve found, is tough because you always move a bit from when you frame it to when you click the shutter. I’ve always operated under the rule that images made using a tripod will be sharper and of higher quality every time.
Some will argue that using a tripod becomes a lot of hard work when photographing wildlife. I agree. It can be. Using a monopod (or your tripod, with legs folded in) will help give you stability and mobility. A Wimberly or Gimbal head for your tripod will also help give you stability and mobility for shooting wildlife. Anything you can use to increase stability and minimize your contact with the camera will increase overall image quality.
Seriousness
First and foremost, how serious are you about photography? Is it something you’re planning on doing regularly? Once a month? Only on vacations? Do you plan on shooting a lot of landscapes? Do you want to make the most out of sunsets and sunrises?
Once you know the answers to these questions, break the selection of your tripod down to a few key categories (mentioned below), and then make the call based on what you feel will benefit you the most.
Use
 The first category is USE. How are you going to use this tripod? If you’re a portrait or wedding photographer, you’ll be keeping the tripod indoors a lot, maybe out in a park on occasion. The size and weight of your tripod won’t be as big of an issue. If you’re a landscape and wildlife photographer, you’ll be outside a lot, hiking, setting up in and around water. This will come into play with the type of tripod you choose.
Material
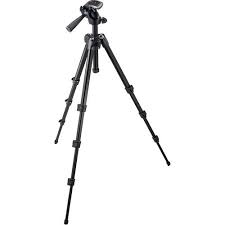
Once you know what kind of legs you want on your tripod, then you need to decide what you want it made out of.
- Carbon fiber is expensive, light, durable, easy to clean, handles the elements well, and has minimal vibration (when I talk about vibration, I’m talking about a car driving by, people walking on a pier near you, water rushing by in a creek, etc.)
- Aluminum is cheap, lightweight, easy to clean, fairly durable to elements, but can have quite a lot of vibrations in certain circumstances. Aluminum is very receptive to vibrations. I’ve also seen quite a few of them bend or get dented so that they don’t close right.
- Wood is expensive, durable, very stable for heavy gear, and if treated correctly, good in the elements, very low vibrations, but it weighs a TON. It’s not something you’ll want to lug around longer than you need to. For people who do a lot of indoor work, or photography with very limited walking, wood tripods aren’t a bad way to go.
There are other materials as well, such as metal, basalt, plastic (which we discussed) and some combination systems. For landscape and wildlife photographers, the tripod goes with them everywhere. Weight is a big factor. Carbon fiber tripods are the norm for landscape and wildlife photographers. Once you’ve lugged around a 10-15lb. tripod for any period of time, you will relish the joys of carbon fiber.
Final Selection
The best way to pick the tripod that will work best for you is to go to a camera store and touch the merchandise. Understand that you do get what you pay for, but that in some cases you will be paying as much for the name on the tripod as the function you are receiving.
- Read reviews on the tripods you’re thinking about purchasing.
- Make the decision to make a tripod a vital piece of your gear, and buy one that will last and stand up to the type of photography you plan on creating.
- Ask friends or professionals what they use, and why.